linamus
I r bak!
- Reaction score
- 57
Ellow again, to my 3'rd tutorial.
What is this?
It's a guide how to change your warcraft UI tile appearance via photoshop, or any alternate program, such as Ulead or Gimp
Tools:
A photo editing program (I use PhotoShop) ((Program should save .tga files))
Wc3 Image Excractor II
Basic knowlegde of extracting/importing with .blp files, and working with photoshop-type programs
Open Wc3 I.E II
Open war3.mqu with this program.
Use Search, and type "UI\Console\Human\HumanUITile0"
Take and Save ...01.blp ...02.blp ...03.blp and ...04.blp
Search again for "UI\Console\Human\HumanUITile-In"
Extract found result.
Open all four ...0#.blp UI tiles.

Using Magic Wand tool, or any other that can select areas, remove all black zones from all four pictures.

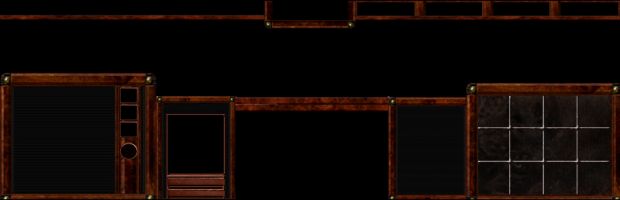
Now create an large new image, and drag all four edited ones there. Try to attach as eachother as much as possible. (don't delete used ones) It should look like this:

It is very ussefull if you would change every part's opacity differently, so you can see all edges where pictures connects
Find any picture you like, who would look good as new UI tile.
I will use this one:

Move this pic to your workstation, and try to attach so it with the UI tile.

I've flipped pic horizntal, and mathed Left, Right, and Bottom. (don't scrimp the Sky, it's still not as neccesary as bottom, so picture height is allmost pointless)
Choose Rectangular Markquee tool. Delinate the first UI tile, opacity difference will help you (chosen layer still is new picture):

Drag this cutout into HumanUITile-01. Change opacity, so you can clearly see both layers

Choose New picture layer. Now delete the sky, or whatever else who goes over Tile. Then delete Portrait mask, and Health/Mana bars.
If minimaps is neccesary, delete it also. I will keep new minimap picture, but will reduce it's opacity by 80% (for some reason setting below 80% won't show in-game) (choose rectangular minimap area, then "Layer Via Cut") Also I will keep command bar (that one next to minimap) covered with new picture.
Delete that original UI tile parts, who is over new picture. After all job's done, we have a part of new UI tile. Swith opacity to 100%, save as tga, open with Wc3 I.E II and save as .blp (keep same name so you won't get lost)
Open WE, open your map. Import your first UI tile. Path isn't neccesary. Go to Advanced -> Game Interface. Select new UI as "Image - Console Texture 1"
Save and go:

Continue same steps for other parts of UI tiles.


Now delete Portrait mask, mana/hp bars again. For that board where's unit's damage/armor/stats used to be, I'll change picture's opacity with 80%. (layer via cut)
Repeat saving/importing steps.
Here we go:

Repeat same steps for third and last UI tiles

Now one more part:
Pick HumanUITile-InventoryCover.blp [This is texture when no unit or unit withour inventory is selected]
Remove black parts.
Move it where your previous UI tiles + picture was. Attach it.
Select area, and move it to the origin. Delete areas, change opacity again, etc etc, repeat.
That's our UI without target:

Well, this is the end. I think I've explained too lame, and most of you didn't got it. And this UI tile I've made may not look good, couse it's just an example. Lemme show you which custom UI I've done with my tLoW:


___________________________
Best Ideas Comes When You're Not Thinking
-> The Land Of Wonders
-> Simple Equipment System TuT
-> Enhance Your Terraining
-> Change Warcraft UI Style
What is this?
It's a guide how to change your warcraft UI tile appearance via photoshop, or any alternate program, such as Ulead or Gimp
Tools:
A photo editing program (I use PhotoShop) ((Program should save .tga files))
Wc3 Image Excractor II
Basic knowlegde of extracting/importing with .blp files, and working with photoshop-type programs
Getting Started
Open Wc3 I.E II
Open war3.mqu with this program.
Use Search, and type "UI\Console\Human\HumanUITile0"
Take and Save ...01.blp ...02.blp ...03.blp and ...04.blp
Search again for "UI\Console\Human\HumanUITile-In"
Extract found result.
Photoshop'ing
Open all four ...0#.blp UI tiles.
Using Magic Wand tool, or any other that can select areas, remove all black zones from all four pictures.
Now create an large new image, and drag all four edited ones there. Try to attach as eachother as much as possible. (don't delete used ones) It should look like this:
It is very ussefull if you would change every part's opacity differently, so you can see all edges where pictures connects
Let's Get To Work
Find any picture you like, who would look good as new UI tile.
I will use this one:
Move this pic to your workstation, and try to attach so it with the UI tile.
I've flipped pic horizntal, and mathed Left, Right, and Bottom. (don't scrimp the Sky, it's still not as neccesary as bottom, so picture height is allmost pointless)
Choose Rectangular Markquee tool. Delinate the first UI tile, opacity difference will help you (chosen layer still is new picture):
Drag this cutout into HumanUITile-01. Change opacity, so you can clearly see both layers
Choose New picture layer. Now delete the sky, or whatever else who goes over Tile. Then delete Portrait mask, and Health/Mana bars.
If minimaps is neccesary, delete it also. I will keep new minimap picture, but will reduce it's opacity by 80% (for some reason setting below 80% won't show in-game) (choose rectangular minimap area, then "Layer Via Cut") Also I will keep command bar (that one next to minimap) covered with new picture.
Delete that original UI tile parts, who is over new picture. After all job's done, we have a part of new UI tile. Swith opacity to 100%, save as tga, open with Wc3 I.E II and save as .blp (keep same name so you won't get lost)
Open WE, open your map. Import your first UI tile. Path isn't neccesary. Go to Advanced -> Game Interface. Select new UI as "Image - Console Texture 1"
Save and go:
Continue same steps for other parts of UI tiles.
Now delete Portrait mask, mana/hp bars again. For that board where's unit's damage/armor/stats used to be, I'll change picture's opacity with 80%. (layer via cut)
Repeat saving/importing steps.
Here we go:
Repeat same steps for third and last UI tiles
Now one more part:
Pick HumanUITile-InventoryCover.blp [This is texture when no unit or unit withour inventory is selected]
Remove black parts.
Move it where your previous UI tiles + picture was. Attach it.
Sorry this picture messed up. I've moved InventoryCover, attached like it should be there, and selected proper image point with rectangular marquee tool

Select area, and move it to the origin. Delete areas, change opacity again, etc etc, repeat.
That's our UI without target:
Well, this is the end. I think I've explained too lame, and most of you didn't got it. And this UI tile I've made may not look good, couse it's just an example. Lemme show you which custom UI I've done with my tLoW:
___________________________
Best Ideas Comes When You're Not Thinking
-> The Land Of Wonders
-> Simple Equipment System TuT
-> Enhance Your Terraining
-> Change Warcraft UI Style
")