fredsmith909
New Member
- Reaction score
- 2
Hi everyone, this is something I have wanted to do in this game for a long time now and I have found a way to make it possible!!!
When I first started Warcraft III the very first thing I did was go right to the settings for the graphics and put the resolution to the max my system would allow it at the time. I was hoping that the higher I put the pixel res, the more land I would see on screen, and therefore be able to select and see more units on screen at one time. Unfortunately, I was disappointed to see that though the graphics looked better, I still saw the same amount of land on the screen.
Needless to say, I was floored, irritated, and utterly disgusted that the main thing I was looking forward to about warcraft III to have implemented that warcraft 2 didn't was not an option. :banghead:
That was many years ago. Now I have figured out a way to do what I wanted done so long ago! And I'm going to share it with you now.
Zooming In And Out
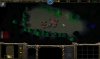
So first to make it perfectly clear what I have figured out, I have 2 screen shots of the level of zoom during game play here:
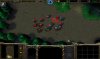
This one is the regular game view. :thdown:

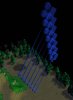
This one is it at 6x "Enter", "-", "Enter" later! :thup:

And it's really not that hard to accomplish!
The example included will show you exactly how it works and you can pretty much copy the cameras and the trigger folder that contains everything you need to make it work for player 1 red, without having to change anything.
http://www.thehelper.net/forums/att...9&stc=1&d=1217350376 CamerZoomingExample.w3m
Step 1: Placing the Cameras and Labeling Them
First place the cameras and name then in an ascending order. And no, it doesn't matter where you place them. It just matters how, meaning the angle and height.

You can do this at any heights or angles, but make sure you label them something that's easy to recognize for keeping it in the order you want. Unless your an advanced user, I would not recommend weird angles applied to your cameras until you have done something like this that's simpler to understand first. Although I haven't messed with applying different angles, the idea of being able to play a map in a series of 360 degree views sounds tantalizing!
Step 2: Coding the Individual Cameras Functions
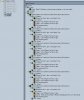
Now we go to the Trigger Editor and make a trigger for each camera.
Uncheck "Initially On" and Label them the same name or similar to your cameras to help avoid confusion.

As you can see in the image above, the event basiclly repeats every 0.10 seconds of game time. And each event will be exactly the same for all the cameras.
The Action sets Red's camera Distance = to the chosen camera over 0.10 seconds. And this is the same action for each camera, just make sure that you indicate the correct camera where it says "(Distance to target of PlayerCamera1 <gen>)" you match that to the correct player for that trigger.
Step 3: Coding the Zoom Out Function
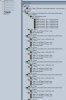
Don't be intimidated by the code, it's just a bunch of "If / Then / Else" statements. What always made these easier for me to understand was to look at this like Yoda was talking to me.

The Event is triggered when Player 1 enters the chat message "-".
The Actions just check to see if triggers are turned on or off. The first looks to see if all of the Individual Cameras Functions are all off. If they are, it turns on the first when "-" is entered, and skips any remaining actions.
The rest of the "If / Then / Else" statements that follow check to see if the corresponding Individual Cameras Function is on. If it is, then it applies the one above it, and turns off the one that it checked for.
Step 4: Coding the Zoom In Function
This is very similar to the Zoom Out trigger. It does the same thing in reverse thought.

The Event is triggered when Player 1 enters the chat message "+".
The Actions just check to see if triggers are turned on or off. It checks to see if the furthest viewing camera function of the Individual Cameras Functions is on. If so, it turns off that one when "+" is entered, turns on the Camera function below it, and skips any remaining actions.
The rest of the "If / Then / Else" statements that follow check to see if the corresponding Individual Cameras Function is on. If it is, then it applies the one below it until they are all turned off. At that point the last one resets the camera to the standard game view.
Step 5: Test It!
Test your map and make sure you try zooming all the way out and then back in. If something isn't working just go back over your code and compare it to mine. Have Fun Zooming!!!
A few things I wanted to point out:
My example doesn't use variables and anyone could copy the cameras and the triggers into there map and make it work! Just make sure you copy the cameras first.
Another great thing about this example is it eliminates the need to have to do code for terrain height changes, because the cameras adjust there own height by default in the game. You will notice it if you play the example.
When I first started Warcraft III the very first thing I did was go right to the settings for the graphics and put the resolution to the max my system would allow it at the time. I was hoping that the higher I put the pixel res, the more land I would see on screen, and therefore be able to select and see more units on screen at one time. Unfortunately, I was disappointed to see that though the graphics looked better, I still saw the same amount of land on the screen.
Needless to say, I was floored, irritated, and utterly disgusted that the main thing I was looking forward to about warcraft III to have implemented that warcraft 2 didn't was not an option. :banghead:
That was many years ago. Now I have figured out a way to do what I wanted done so long ago! And I'm going to share it with you now.
Zooming In And Out
So first to make it perfectly clear what I have figured out, I have 2 screen shots of the level of zoom during game play here:
This one is the regular game view. :thdown:
This one is it at 6x "Enter", "-", "Enter" later! :thup:
And it's really not that hard to accomplish!
The example included will show you exactly how it works and you can pretty much copy the cameras and the trigger folder that contains everything you need to make it work for player 1 red, without having to change anything.
http://www.thehelper.net/forums/att...9&stc=1&d=1217350376 CamerZoomingExample.w3m
Step 1: Placing the Cameras and Labeling Them
First place the cameras and name then in an ascending order. And no, it doesn't matter where you place them. It just matters how, meaning the angle and height.
You can do this at any heights or angles, but make sure you label them something that's easy to recognize for keeping it in the order you want. Unless your an advanced user, I would not recommend weird angles applied to your cameras until you have done something like this that's simpler to understand first. Although I haven't messed with applying different angles, the idea of being able to play a map in a series of 360 degree views sounds tantalizing!
Step 2: Coding the Individual Cameras Functions
Now we go to the Trigger Editor and make a trigger for each camera.
Uncheck "Initially On" and Label them the same name or similar to your cameras to help avoid confusion.
As you can see in the image above, the event basiclly repeats every 0.10 seconds of game time. And each event will be exactly the same for all the cameras.
The Action sets Red's camera Distance = to the chosen camera over 0.10 seconds. And this is the same action for each camera, just make sure that you indicate the correct camera where it says "(Distance to target of PlayerCamera1 <gen>)" you match that to the correct player for that trigger.
Step 3: Coding the Zoom Out Function
Don't be intimidated by the code, it's just a bunch of "If / Then / Else" statements. What always made these easier for me to understand was to look at this like Yoda was talking to me.
The Event is triggered when Player 1 enters the chat message "-".
The Actions just check to see if triggers are turned on or off. The first looks to see if all of the Individual Cameras Functions are all off. If they are, it turns on the first when "-" is entered, and skips any remaining actions.
The rest of the "If / Then / Else" statements that follow check to see if the corresponding Individual Cameras Function is on. If it is, then it applies the one above it, and turns off the one that it checked for.
Step 4: Coding the Zoom In Function
This is very similar to the Zoom Out trigger. It does the same thing in reverse thought.
The Event is triggered when Player 1 enters the chat message "+".
The Actions just check to see if triggers are turned on or off. It checks to see if the furthest viewing camera function of the Individual Cameras Functions is on. If so, it turns off that one when "+" is entered, turns on the Camera function below it, and skips any remaining actions.
The rest of the "If / Then / Else" statements that follow check to see if the corresponding Individual Cameras Function is on. If it is, then it applies the one below it until they are all turned off. At that point the last one resets the camera to the standard game view.
Step 5: Test It!
Test your map and make sure you try zooming all the way out and then back in. If something isn't working just go back over your code and compare it to mine. Have Fun Zooming!!!
A few things I wanted to point out:
My example doesn't use variables and anyone could copy the cameras and the triggers into there map and make it work! Just make sure you copy the cameras first.
Another great thing about this example is it eliminates the need to have to do code for terrain height changes, because the cameras adjust there own height by default in the game. You will notice it if you play the example.