
Siretu
Starcraft 2 Editor Moderator
- Reaction score
- 294
This is going to be a (hopefully) simple tutorial that will serve as an introduction to dialogs. It will not teach you how to do things in the most effective or dynamic way possible, but is instead meant to explain how dialogs work to the point where the reader can start experimenting on his/her own.
If you are viewing this on http://starcraft-2-galaxy-editor-tutorials.thehelper.net , chances are that some tags are inactivated. For the best reading, read it here.
Table of contents
1. Introduction
Assuming you wandered upon this tutorial by mistake, you might now be wondering: What's a dialog?
If you have experience with the warcraft 3 editor, you might've used dialogs back then for things like choosing a hero.
It probably looked something like this:
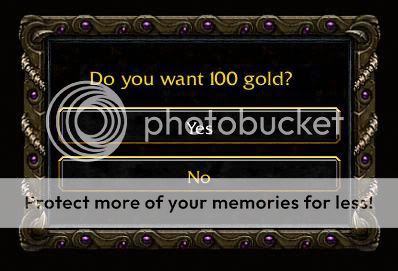
(credit goes to revolver for the picture)
In starcraft 2, the dialog was remade into a very powerful tool that you can use to create the most fascinating things.
Basically, a dialog is a surface you can create on the user's screen on which you can create buttons, images, dropdown menus and more.
To demonstrate some uses of a dialog, here's a screenshot from one of my maps:

In this screenshot, I am using three dialogs. See if you can find out where the are.
Answer:
2. Tutorial Goal
So what are we going to accomplish in this tutorial?
We are going to create a Hero selection dialog that will look something like this:

If you're disappointed in the looks of this, don't be. You could create much more intriguing dialogs given some time but due to the simplicity of this tutorial we will keep it simple.
If you're not disappointed, great! Let's move on.
3. Time to work
Time to get started with the actual work. Open up your map and open the trigger editor. For the rest of the tutorial, I will assume you know the absolute basics of the trigger editor(Creating new triggers, events, variables, conditions and actions) because if you don't, this is not what you should be focusing on for the moment.
Create a new trigger, we will call it "Create Hero Pick Dialog".
We want to create it when the map starts so we'll add the event "Map initialization". We always want to create it when the map starts so we don't need any conditions.
Let's move on to the actions. The first thing we need to do is to create the dialog itself. This is done with the action "Create Dialog".
When you add the "Create Dialog" action you will see that it has a number of parameters:
Here's what each of them do:
For this, we want a pretty big dialog to fit all our pictures and such so we will go for:
Width: 800
Height: 600
We'll use the anchor "Center" since we want the dialog in the middle of the screen.
No offsets needed since it's already where we want it to be.
Now if you test your map, you would expect there to be a dialog box on your screen, however to see it you first need to show it.
We might not want to show it as soon as the map starts, but let's make it so for now. Add the action "Show/Hide dialog".
Visible: Show
Dialog: Last created dialog
Players: All players
Now in almost all cases you want to be able to reference the dialog outside of the trigger where you create it. Maybe you want to hide it after the user clicks a button or you might want to modify it later on. This is why we're now going to save our newly created dialog in a variable.
Create a new variable(make sure it's global, that means it's in the list to the left along with all your triggers). Call it HeroDialog and change the type to Dialog.
Go back to your trigger and add the action "Set variable". Set HeroDialog = (Last Created Dialog).
Now it's time to create the content for the dialog. A dialog has items. An item can be an image, button, checkbox, etc.
First, let's create the portraits for our heroes. We will need a dialog item with the image type for this. Use the action "Create Dialog Item (Image)"
This action comes with a bunch of different parameters. I will go through them all(although a bit faster than I did with the "Create Dialog" action)
Here are the parameters I used:
Create Dialog Item (Image)
Dialog: Last Created Dialog
Width: 200
Height: 300
Anchor: Top Left
Offset X: 50
Offset Y: 50
Tooltip: ""
Image: Assets\Textures\hightemplarportrait_static.dds
Image Type: Normal
Tiled: false
Tint Color: White
Blend Mode: Normal
Copy this action two times(we have three heroes, so we need a portrait for each one)
In the first copy, change Offset X to 300 and Image to "Assets\Textures\battlecruiserportrait_static.dds"
In the second copy, change Offset X to 550 and Image to "Assets\Textures\archonportrait_static.dds"
It's time to create the text you see under the portraits.
Text areas in Starcraft 2 are called "Labels" so let's create a new text field with the action: "Create Dialog Item (Label)"
As you can see, this action has mostly the same parameters as "Create Dialog Item (Image)". There are some new though. I've explained them here:
I used these parameters:
Create Dialog Item (Label)
Dialog: Last Created Dialog
Width: 200
Height: 100
Anchor: Top Left
Offset X: 50
Offset Y: 400
Text: "Intelligence based hero. Abilities: Feedback, Psi Storm"
Color: White
Text Writeout: false
Text Writeout Duration: 2.0
Copy this action two times.
In the first copy, change Offset X to 300 and text to "Flying hero. Abilities: Yamato cannon, Warp Drive."
In the second copy, change Offset X to 550 and text to "Psionic Hero. Abilities: Psi Chain, Hallucination."
Now it's time for the buttons.
As you can see, this action as well uses mostly the same parameters as the other two dialog items.
The new parameters are explained here:
Here are my parameters.
Create Dialog Item (Button)
Dialog: Last Created Dialog
Width: 200
Height: 50
Anchor: Top Left
Offset X: 50
Offset Y: 500
Tooltip: ""
Button Text: "Pick Hero"
Hover Image: ""
Copy this two times.
In the first copy, change offset X to 300.
In the second copy, change offset Y to 550.
Let's step back and think for a while. We will need to reference to our buttons outside of this trigger. Otherwise we wont know when the player presses a button. Therefore we need to save the dialog buttons in a variable.
Create three new variables with type "Dialog Item". Name them something like "HeroPick1", "HeroPick2", "HeroPick3".
We need to set these to the button we create. So create the action "Set variable" after each "Create Dialog Item (Button)". You should set all of them(HeroPick1, HeroPick2, HeroPick3) to (Last created Dialog).
Your triggers should now look something like:
Now the dialog should look like the one in the picture of our goal. However we're not done yet. Our dialog might be good-looking, but it's completely useless since it does nothing.
Let's create a new trigger that we call "Pick Hero".
We want it to do stuff when we click a button so we add the Event "Dialog Item is used". We only want the trigger to run when one of our hero pick buttons is clicked so in conditions we add "Or". Under the "or" we add three conditions:
Now we come to actions. When a player picks a hero we want to create the correct hero for the player and we also want to hide the hero dialog for the player so the player wont be able to pick additional heroes.
To create the correct hero we will use the "switch" action. The switch action chooses what case to do depending on the value of a variable. In our case we want the switch to depend on the value of (Used Dialog Item).
We will add one case for each hero.
In each case, change the value to the correct dialog item. For example, the high templar's case would look like this:
General - If (HeroPick1)
Actions
Unit - Create 1 High Templar for player (Triggering player) at (Current camera target of player (Triggering player)) using default facing (No Options)
In this case I create the hero in the middle of the screen for the player.
Outside of the switch you want the action "Show/Hide dialog".
You want to Hide HeroDialog for (Player group((Triggering player)))
Your code should now look like this:
4. Conclusion
This is it! The end! Goal accomplished. Hopefully you'll be able to figure out the other stuff like checkboxes and dropdown menus.
I have one thing left to teach and it is an important thing. Use constants to store item sizes and offsets and such. As an example, let's say we wanted to change the portrait size. Since we have 3 heroes we would have to change the width and height three times each. That is unnecessary and when you're doing bigger more complex dialogs, editing each item by hand might be a real pain.
I didn't know this when I made a big tech tree for one of my first custom maps so I will probably never change how it looks even though I want to. Why? Because that means I would have to change the dimensions on 100 buttons and 100 images. That's just too much effort to be worth it.
So in our example we could've made a constant variable called HeroPortraitWidth and make all the images width use HeroPortraitWidth. Then we would only have to change HeroPortraitWidth to change the width of all portraits.
With some smart use of for-loops and constants, you can can make the offset work as well.
For examples on this, check out my JAVA library. It's very dynamic when it comes to stuff like this(http://www.thehelper.net/forums/showthread.php/166178-JAVA-(Just-another-Voting-Asset)?p=1364593)
One thing to keep in mind when you are working with dialogs is that all the measurements are in pixels. This means that a dialog that only covers half of your 25" screen might completely cover someone's laptop screen. Keep this in mind when creating your dialogs.
One way to fix this is to scale according to screen resolution. Problem is that you then need to get the screen resolution. There are some custom made libraries that does this for you, but be aware that you need the user to calibrate once.
Custom Screen Resolution libraries:
http://www.thehelper.net/forums/showthread.php/154655-Screen-Resolution
http://www.sc2mapster.com/forums/resources/trigger-libraries/17101-library-get-resolution/
Advanced challenges:
I've attached the map if there was something you didn't understand.
If you are viewing this on http://starcraft-2-galaxy-editor-tutorials.thehelper.net , chances are that some tags are inactivated. For the best reading, read it here.
Table of contents
- Introduction
- Tutorial Goal
- Time to work
- Conclusion
1. Introduction
Assuming you wandered upon this tutorial by mistake, you might now be wondering: What's a dialog?
If you have experience with the warcraft 3 editor, you might've used dialogs back then for things like choosing a hero.
It probably looked something like this:
(credit goes to revolver for the picture)
In starcraft 2, the dialog was remade into a very powerful tool that you can use to create the most fascinating things.
Basically, a dialog is a surface you can create on the user's screen on which you can create buttons, images, dropdown menus and more.
To demonstrate some uses of a dialog, here's a screenshot from one of my maps:
In this screenshot, I am using three dialogs. See if you can find out where the are.
Answer:
1. The small frame above the minimap with 3 buttons
2. The upkeep message below the marines.
3. The red square on the minimap.
The first one is just a simple dialog with 3 buttons with 3 images over the buttons for button icons.
The second one is a dialog where I hid the background. I added three images, one is the achievement frame and the other two is the pictures of gas and minerals that I added in the two square holes in the frame. I also added a label in the middle for the text.
The third one is kind of tricky, I put a dialog over the entire minimap(don't worry, you can still click through it) I then hid the dialog background. When a player captures a square, I add an image(white32.dds, if I recall correctly) at the correct position on the minimap. Then I change the transparency and color of the last created image.
2. Tutorial Goal
So what are we going to accomplish in this tutorial?
We are going to create a Hero selection dialog that will look something like this:
If you're disappointed in the looks of this, don't be. You could create much more intriguing dialogs given some time but due to the simplicity of this tutorial we will keep it simple.
If you're not disappointed, great! Let's move on.
3. Time to work
Time to get started with the actual work. Open up your map and open the trigger editor. For the rest of the tutorial, I will assume you know the absolute basics of the trigger editor(Creating new triggers, events, variables, conditions and actions) because if you don't, this is not what you should be focusing on for the moment.
Create a new trigger, we will call it "Create Hero Pick Dialog".
We want to create it when the map starts so we'll add the event "Map initialization". We always want to create it when the map starts so we don't need any conditions.
Let's move on to the actions. The first thing we need to do is to create the dialog itself. This is done with the action "Create Dialog".
When you add the "Create Dialog" action you will see that it has a number of parameters:
- Modal
- Width
- Height
- OffsetX
- OffsetY
- Anchor
Here's what each of them do:
Modal:
Right now, modal dialogs has not been implemented. Therefore there's no difference between modal and non-modal dialogs. If you're worried, choose non-modal but you will most likely be fine with modal.
Width:
This is simply the width of the dialog
Height:
This is the Height of the dialog.
Offsets are your way to position your dialog on the screen. Offsets are relative to the anchor you picked. So if you have offsetx set to 100, it will be offset 100 pixels on the x-axis from your anchor.
OffsetX:
This is your X offset. Use this to offset the dialog from the anchor on the x-axis
OffsetY:
This is your Y offset. Use this to offset the dialog from the anchor on the y-axis
Anchor:
Anchors are preplaced points on your screen that you can use to attach your dialogs to so that their offsets make sense. There are 9 anchors: Top, left, right, bottom, center, top left, top right, bottom left and bottom right. They should be self-explanatory.
For this, we want a pretty big dialog to fit all our pictures and such so we will go for:
Width: 800
Height: 600
We'll use the anchor "Center" since we want the dialog in the middle of the screen.
No offsets needed since it's already where we want it to be.
Now if you test your map, you would expect there to be a dialog box on your screen, however to see it you first need to show it.
We might not want to show it as soon as the map starts, but let's make it so for now. Add the action "Show/Hide dialog".
Visible: Show
Dialog: Last created dialog
Players: All players
Now in almost all cases you want to be able to reference the dialog outside of the trigger where you create it. Maybe you want to hide it after the user clicks a button or you might want to modify it later on. This is why we're now going to save our newly created dialog in a variable.
Create a new variable(make sure it's global, that means it's in the list to the left along with all your triggers). Call it HeroDialog and change the type to Dialog.
Go back to your trigger and add the action "Set variable". Set HeroDialog = (Last Created Dialog).
Now it's time to create the content for the dialog. A dialog has items. An item can be an image, button, checkbox, etc.
First, let's create the portraits for our heroes. We will need a dialog item with the image type for this. Use the action "Create Dialog Item (Image)"
This action comes with a bunch of different parameters. I will go through them all(although a bit faster than I did with the "Create Dialog" action)
Dialog:
This is the dialog you want the image to be created on.
Width:
This is the image's width.
Height:
This is the image's height.
Anchor:
This is the dialog item's anchor. It works the same as the anchors for dialogs with one vital difference. This anchor references to the dialog, not the screen. This means that if you pick the bottom left anchor, you're picking the bottom left of the dialog, not the screen itself.
Offset X:
Not much to say, works the same as the dialog's OffsetX.
Offset Y:
Same here, works the same as the dialog's OffsetY.
Tooltip:
This text will be displayed if you hold your mouse over the image.
Image:
The image to display.
Image Type:
In most cases, you just want a normal picture but if you're doing custom ui, you might want a special border or such. In these cases you can have a different type. This will basically make cut the image into pieces and puzzle it together in different ways.
Tiled:
If this is true, the picture wont be resized(if you specify a width and height that is bigger than the picture's actual width and height it will create the same picture again to fill in the room(basically making tiles of your image)
If it is false, the picture will be scaled to the width and height you specified.
Tint Color:
Can be used to tint your image with a specific color.
Blend Mode:
This is an advanced parameter that you rarely have to set to something else than Normal.
Create Dialog Item (Image)
Dialog: Last Created Dialog
Width: 200
Height: 300
Anchor: Top Left
Offset X: 50
Offset Y: 50
Tooltip: ""
Image: Assets\Textures\hightemplarportrait_static.dds
Image Type: Normal
Tiled: false
Tint Color: White
Blend Mode: Normal
Copy this action two times(we have three heroes, so we need a portrait for each one)
In the first copy, change Offset X to 300 and Image to "Assets\Textures\battlecruiserportrait_static.dds"
In the second copy, change Offset X to 550 and Image to "Assets\Textures\archonportrait_static.dds"
It's time to create the text you see under the portraits.
Text areas in Starcraft 2 are called "Labels" so let's create a new text field with the action: "Create Dialog Item (Label)"
As you can see, this action has mostly the same parameters as "Create Dialog Item (Image)". There are some new though. I've explained them here:
Text:
This is the text that will be shown.
Color:
The color of the text.
Text writeout:
If this is true, the text will be typed out one letter at a time.
Text Writeout Duration:
This is how fast the text is written if you use text writeout.
This is the text that will be shown.
Color:
The color of the text.
Text writeout:
If this is true, the text will be typed out one letter at a time.
Text Writeout Duration:
This is how fast the text is written if you use text writeout.
I used these parameters:
Create Dialog Item (Label)
Dialog: Last Created Dialog
Width: 200
Height: 100
Anchor: Top Left
Offset X: 50
Offset Y: 400
Text: "Intelligence based hero. Abilities: Feedback, Psi Storm"
Color: White
Text Writeout: false
Text Writeout Duration: 2.0
Copy this action two times.
In the first copy, change Offset X to 300 and text to "Flying hero. Abilities: Yamato cannon, Warp Drive."
In the second copy, change Offset X to 550 and text to "Psionic Hero. Abilities: Psi Chain, Hallucination."
Now it's time for the buttons.
As you can see, this action as well uses mostly the same parameters as the other two dialog items.
The new parameters are explained here:
Button Text:
This is the text written on the button
Hover Image:
This image will be shown over your button when you hover your mouse over the button. You will rarely need this so you can usually keep it at ""
This is the text written on the button
Hover Image:
This image will be shown over your button when you hover your mouse over the button. You will rarely need this so you can usually keep it at ""
Here are my parameters.
Create Dialog Item (Button)
Dialog: Last Created Dialog
Width: 200
Height: 50
Anchor: Top Left
Offset X: 50
Offset Y: 500
Tooltip: ""
Button Text: "Pick Hero"
Hover Image: ""
Copy this two times.
In the first copy, change offset X to 300.
In the second copy, change offset Y to 550.
Let's step back and think for a while. We will need to reference to our buttons outside of this trigger. Otherwise we wont know when the player presses a button. Therefore we need to save the dialog buttons in a variable.
Create three new variables with type "Dialog Item". Name them something like "HeroPick1", "HeroPick2", "HeroPick3".
We need to set these to the button we create. So create the action "Set variable" after each "Create Dialog Item (Button)". You should set all of them(HeroPick1, HeroPick2, HeroPick3) to (Last created Dialog).
Your triggers should now look something like:
Trigger:
- Create Hero Pick Dialog
- Events
- Game - Map initialization
- Local Variables
- Conditions
- Actions
- Dialog - Create a Modal dialog of size (800, 600) at (0, 0) relative to Center of screen
- Dialog - Show (Last created dialog) for (All players)
- Variable - Set HeroDialog = (Last created dialog)
- Dialog - Create an image for dialog (Last created dialog) with the dimensions (200, 300) anchored to Top Left with an offset of (50, 50) setting the tooltip to "" using the image Assets\Textures\hightemplarportrait_static.dds as a Normal type with tiled set to false tint color White and blend mode Normal
- Dialog - Create an image for dialog (Last created dialog) with the dimensions (200, 300) anchored to Top Left with an offset of (300, 50) setting the tooltip to "" using the image Assets\Textures\battlecruiserportrait_static.dds as a Normal type with tiled set to false tint color White and blend mode Normal
- Dialog - Create an image for dialog (Last created dialog) with the dimensions (200, 300) anchored to Top Left with an offset of (550, 50) setting the tooltip to "" using the image Assets\Textures\archonportrait_static.dds as a Normal type with tiled set to false tint color White and blend mode Normal
- Dialog - Create a label for dialog (Last created dialog) with the dimensions (200, 100) anchored to Top Left with an offset of (50, 400) with the text "Intelligence based hero. Abilities:..." color set to White text writeout set to false with a writeout duration of 2.0
- Dialog - Create a label for dialog (Last created dialog) with the dimensions (200, 100) anchored to Top Left with an offset of (300, 400) with the text "Flying hero. Abilities: Yamato cann..." color set to White text writeout set to false with a writeout duration of 2.0
- Dialog - Create a label for dialog (Last created dialog) with the dimensions (200, 100) anchored to Top Left with an offset of (550, 400) with the text "Psionic Hero. Abilities: Psi Chain,..." color set to White text writeout set to false with a writeout duration of 2.0
- Dialog - Create a button for dialog (Last created dialog) with the dimensions (200, 50) anchored to Top Left with an offset of (50, 500) setting the tooltip to "" with button text "Pick Hero" and the hover image set to ""
- Variable - Set HeroPick1 = (Last created dialog item)
- Dialog - Create a button for dialog (Last created dialog) with the dimensions (200, 50) anchored to Top Left with an offset of (300, 500) setting the tooltip to "" with button text "Pick Hero" and the hover image set to ""
- Variable - Set HeroPick2 = (Last created dialog item)
- Dialog - Create a button for dialog (Last created dialog) with the dimensions (200, 50) anchored to Top Left with an offset of (550, 500) setting the tooltip to "" with button text "Pick Hero" and the hover image set to ""
- Variable - Set HeroPick3 = (Last created dialog item)
- Events
Now the dialog should look like the one in the picture of our goal. However we're not done yet. Our dialog might be good-looking, but it's completely useless since it does nothing.
Let's create a new trigger that we call "Pick Hero".
We want it to do stuff when we click a button so we add the Event "Dialog Item is used". We only want the trigger to run when one of our hero pick buttons is clicked so in conditions we add "Or". Under the "or" we add three conditions:
- (Used dialog item) == HeroPick1
- (Used dialog item) == HeroPick2
- (Used dialog item) == HeroPick3
Now we come to actions. When a player picks a hero we want to create the correct hero for the player and we also want to hide the hero dialog for the player so the player wont be able to pick additional heroes.
To create the correct hero we will use the "switch" action. The switch action chooses what case to do depending on the value of a variable. In our case we want the switch to depend on the value of (Used Dialog Item).
We will add one case for each hero.
In each case, change the value to the correct dialog item. For example, the high templar's case would look like this:
General - If (HeroPick1)
Actions
Unit - Create 1 High Templar for player (Triggering player) at (Current camera target of player (Triggering player)) using default facing (No Options)
In this case I create the hero in the middle of the screen for the player.
Outside of the switch you want the action "Show/Hide dialog".
You want to Hide HeroDialog for (Player group((Triggering player)))
Your code should now look like this:
Trigger:
- Pick Hero
- Events
- Dialog - Any Dialog Item is used by Player Any Player with event type Clicked
- Local Variables
- Conditions
- Or
- Conditions
- (Used dialog item) == HeroPick1
- (Used dialog item) == HeroPick2
- (Used dialog item) == HeroPick3
- Conditions
- Or
- Actions
- General - Switch (Actions) depending on (Used dialog item)
- Cases
- General - If (HeroPick1)
- Actions
- Unit - Create 1 High Templar for player (Triggering player) at (Current camera target of player (Triggering player)) using default facing (No Options)
- Actions
- General - If (HeroPick2)
- Actions
- Unit - Create 1 Battlecruiser for player (Triggering player) at (Current camera target of player (Triggering player)) using default facing (No Options)
- Actions
- General - If (HeroPick3)
- Actions
- Unit - Create 1 Archon for player (Triggering player) at (Current camera target of player (Triggering player)) using default facing (No Options)
- Actions
- General - If (HeroPick1)
- Default
- Cases
- Dialog - Hide HeroDialog for (Player group((Triggering player)))
- General - Switch (Actions) depending on (Used dialog item)
- Events
4. Conclusion
This is it! The end! Goal accomplished. Hopefully you'll be able to figure out the other stuff like checkboxes and dropdown menus.
I have one thing left to teach and it is an important thing. Use constants to store item sizes and offsets and such. As an example, let's say we wanted to change the portrait size. Since we have 3 heroes we would have to change the width and height three times each. That is unnecessary and when you're doing bigger more complex dialogs, editing each item by hand might be a real pain.
I didn't know this when I made a big tech tree for one of my first custom maps so I will probably never change how it looks even though I want to. Why? Because that means I would have to change the dimensions on 100 buttons and 100 images. That's just too much effort to be worth it.
So in our example we could've made a constant variable called HeroPortraitWidth and make all the images width use HeroPortraitWidth. Then we would only have to change HeroPortraitWidth to change the width of all portraits.
With some smart use of for-loops and constants, you can can make the offset work as well.
For examples on this, check out my JAVA library. It's very dynamic when it comes to stuff like this(http://www.thehelper.net/forums/showthread.php/166178-JAVA-(Just-another-Voting-Asset)?p=1364593)
One thing to keep in mind when you are working with dialogs is that all the measurements are in pixels. This means that a dialog that only covers half of your 25" screen might completely cover someone's laptop screen. Keep this in mind when creating your dialogs.
One way to fix this is to scale according to screen resolution. Problem is that you then need to get the screen resolution. There are some custom made libraries that does this for you, but be aware that you need the user to calibrate once.
Custom Screen Resolution libraries:
http://www.thehelper.net/forums/showthread.php/154655-Screen-Resolution
http://www.sc2mapster.com/forums/resources/trigger-libraries/17101-library-get-resolution/
Advanced challenges:
1. Save the hero information(image, label text, unit-type) in a record.
2. Make the dialog support more heroes to the point where you just set the amount of heroes in a constant and change the heroes by editing the record and then it will auto-scale the dialog.
2. Make the dialog support more heroes to the point where you just set the amount of heroes in a constant and change the heroes by editing the record and then it will auto-scale the dialog.
I've attached the map if there was something you didn't understand.
")

