
The Basics of the Warcraft III: Reign of Chaos World Editor
This tutorial will cover the ground-rules that you need to know to make a basic map. My goal with this is to familiarize you with the World Editor so that you have a strong foothold to learn the advanced features.This will NOT include Frozen Throne editor things, because the Frozen Throne editor is just an advanced version of the Reign of Chaos editor.
NOTE: This tutorial is for beginners. There are no 'advanced' explanations, only how you can go about making a simple first map.
You will need:
-Warcraft III: Reign of Chaos installed
This tutorial will cover:
1• Getting started
2• Choosing your map genre
3• Terraining
4• Custom Units
5• Custom Triggers
6• Custom Items and Item-related triggers
7•Bonus Feature: Using the Helper Forums efficiently
••••••••••••••••••••••••••••••••••••••••••••••••••••••••••••••••••••••••••••••••••••••••••••••••••••••••••••••••••••••••••••••••••••••••••••••••
Part 1; Getting Started
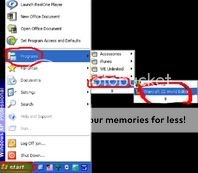
First, you will need to open your Warcraft III World Editor. You can find the start-up under the Start button in the bottom left. Start > Programs > Warcraft III > Warcraft III World Editor
Click on the File tab on the top-left of your screen. A list will drop down with several options. Select 'New Map'.
A window will pop up, asking for your preferences.
There will be several options and sub-selections.
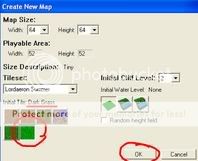
• The 'Playable Area' can be ignored, because it just tells you how much room there is within the boundaries. You can increase that later by removing the boundaries.
• The 'Size Description' is just something to label maps, and has no significance.
• The ‘Tileset’ is what your ground will look like. Lordaeron Summer is the default Tileset and is the most-used one. Lordaeron Summer features Dirt, Rough Dirt, Grassy Dirt, Rock, Grass and Dark Grass tiles.
• The ‘Initial Tile’ is what all of your ground will look like upon starting. There are tabs with 'preview' icons, select the tab with your preferred tile. I favor Dark Grass.
• The 'Initial Cliff Level' is how far up your ground will be from the base, or dark water.
• The 'Initial Water Level' is how deep your water will be at the start.
• Checking the 'Random Height Field' box will make your map have bumps all over the ground, like an earthquake.
• You will want to choose an appropriate base for your map. For example, do not select Rock tiles (which are un-buildable) for your base tile if your map includes building.
•••••••••••••••••••••••••••••••••••••••••••••••••••••••••••••••••••••••••••••••••••••••••••••••••••••••••••••••••••••••••••••••••••••••••••••••••
Part 2; Choosing a Genre
Now that you have your map open and your initial settings up, you need to decide on your map genre. What is a 'genre?' It is what your map is associated with. It's the type of game you're going to make. For example, Tower Defense, Capture the Flag, Murder Mysteries, Hero Wars, or RPG's.• Choose a game-type that interests YOU. If you do not like the game you're making, you will not have fun making it and you most likely will not finish it.
• Choose a game-type that you think you can do. Do not choose massive games like DotA as your first map, because they are just big and bulky and take a very long time to make.
• Do not just edit someone else's map to make it seem like yours. This is considered stealing and is a very stupid thing to do. You can look at maps to get ideas, but generally you'll want to start a map from scratch, unless you have the maker's permission.
•••••••••••••••••••••••••••••••••••••••••••••••••••••••••••••••••••••••••••••••••••••••••••••••••••••••••••••••••••••••••••••••••••••••••••••••••
Part 3; Terraining
Your Terrain is your ground and water. To access your 'Terraining' toolbar, press T while in the World Editor. You will get a new window with several selections.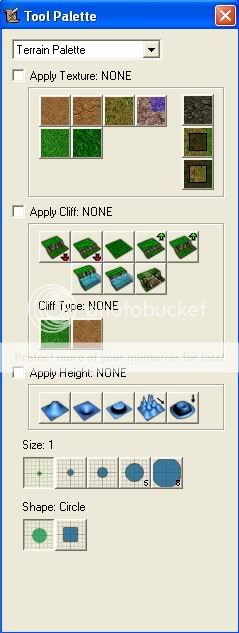
• The 'Apply Texture' checkbox indicates that you want to apply a tile. To select the tile that you want, click on the icon of the texture. Once you have chosen your tile, move your cursor over your original World Editor window and left-click where you want to place that tile-type.
• The 'Apply Cliff' checkbox indicates that you want to apply a cliff modification. Select from the icons the feature you want to use on your ground. Ramps may only be placed on single increase cliffs. For example, level 1 to level 2, level 2 to level 3, level 3 to level 4... etc.
• The 'Cliff Type' is what you want your cliff sides / surrounding tiles to look like. These vary depending on your tileset.
• The 'Apply Height' checkbox indicates that you want to changes the height of the ground, without making cliffs. Raise raises the ground level, Lower lowers the ground level, Plateau makes wherever you drag your mouse the same as your initial click, Noise makes random height levels in an area and Smooth smooths out any bumps or dips that you made.
• The 'Size' is how big your brush is.
• The 'Shape' is what shape your brush has. This has two selections, Circle and Square.
• You will want your terrain to match your genre. For example, you would not want to put Lordaeron Summer trees in your Wintermaul or Barrens trees in your Lordaeron Summer tileset, they just don't match.
• You can change the tiles in your tool palette by selecting the 'Modify Tileset' choice under Advanced.
Advanced > Modify Tileset
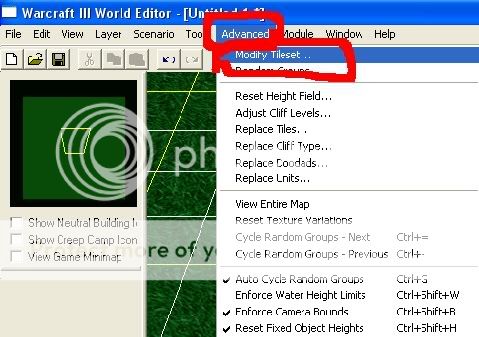
A new window labelled 'Modify Tileset' will appear.

Here you can select a different Tileset or you can create a custom one.
To create a Custom Tileset, check the 'Custom Tileset' checkbox near the top right of the window. Now you can select individual tiles from other tilesets that you want to use.
NOTE: Tiles with red squares on them cannot be added, removed, or altered. Some of these tiles may be found under the Cliff Tile groups, though.
Add the Tiles that you want to use into your Tileset. You can remove some of your original tiles to make room, if you have to. After you are done, click OK. It may lag for a moment, but it will add the tiles to your tool palette for you to select and use.
•••••••••••••••••••••••••••••••••••••••••••••••••••••••••••••••••••••••••••••••••••••••••••••••••••••••••••••••••••••••••••••••••••••••••••••••••
Part 4; Custom Units
Custom Units are units that have had their settings altered to be used in a custom game. You can change many things about a unit. Some of the most noticeable things are the Damage, the Armor and the Abilities.
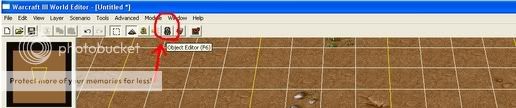
To change the settings of a unit, you will need to go into the Object Editor. To open the Object Editor, click the tab with the helmet icon near the top and middle of your World Editor window.
Once you have the Object Editor open, select the Units tab, found near the top left. On the left of the window will be a list of folders with units that you can use in the map. Select the Footman unit under
Standard Units (466) > Human (67) > Melee (31) > Units (10) > Footman
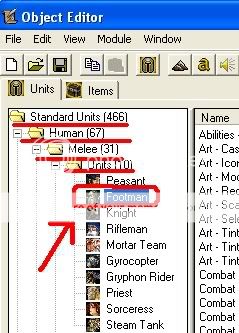
Once you select the Footman unit, a long list will appear in a box to the right of the unit list.
This list includes almost all of the things about a unit. Most of this is self-explanatory, but I will explain how you edit the items and what certain things do.
To edit something in this menu, double left-click it. A new window will pop up, asking you for information and confirmation.

Change the settings to what you want them to be, and click OK.
One way to speed up the editing if you want several units that are similar is to copy them. Select the unit you want to copy and press the keys Control and C (at the same time)(or go to Edit > Copy) and then Control and V (at the same time)(or go to Edit > Paste)
Please take note that unit editing is slow and cumbersome. There is no faster way, other than copying unit from other maps, than to just select and edit it, as demonstrated.
• Field Values and what they mean
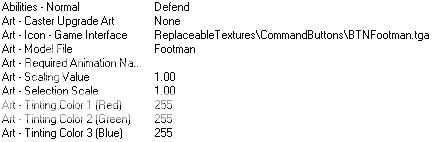
These are the 'Art' values. (I have also included the 'Abilities' value in, for simplicity purposes.) The Art values are the values that have to do with what the unit looks like and (pretaining to the Art- Caster Upgrade Art) what it does when it upgrades.
• The 'Art - Model File' is what skin your unit will have. For example, you can make it look like a doodad, or you can make it look like an ability, or a unit. Looking through the choices in these is often a good way to get inspiration for making units.
• The 'Art - Icon - Game Interface' is the icon your unit will display if you select multiple units, or if it is a hero. It is a good idea to have your icon match your unit, otherwise people may become confused.
•The 'Art - Scaling Value' is how big your unit will appear. Editing this will NOT change your unit's collision size (covered later in this tutorial).
•The 'Art - Selection Scale' is how big the circle around your unit is when you select it, in relation to your Scaling Value.
•The 'Tinting Color 1 / 2 / 3' is what shade your unit is. 1 is Red, 2 is Green, and 3 is Blue. You can use different shading percentages with each color to create different colors. Having 0 in all fields will make the unit black.
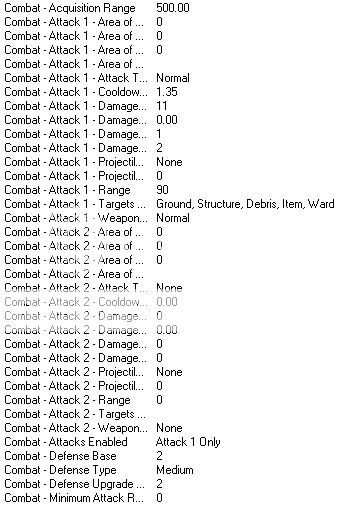
These are the 'Combat' values. They include everything to do with attacking / defending.
• The Acquisition Range is how close a unit has to come to you before your unit automatically attacks. Note that if you set this value to less than your Attack Range, your unit will not be able to attack.
• The 'Area of Effect' values are what make units have 'Splash' damage, which damages multiple units with one attack, if they are close enough together. The 'Splash' can (and should) be layered. For example, you could set 'small damage' to 300, 'Medium Damage' to 200, and 'Full Damage' to 100. This will make it so that the splash damages units at range 201-300 a little bit, units at range 101-200 a little bit more, and units at range 0-100 with the full attack damage.
• If you wanted to make a unit have a stronger attack, you would edit the 'Combat - Attack 1 / 2 - Damage...' fields.
• If you wanted a stronger Defense, you would edit the 'Combat - Defense' fields.
• Note that Projectiles should be used for ranged attacks only. Any attack range that is 200 or less can be considered melee.
• The 'Defense Base' is how much armor your unit will have without any modifications. The 'Defense Type' is what kind of armor your unit will have. Different attacks affect different armor types in different ways.
• The 'Minimum Attack Range' should not be modified except for units with 'Splash' damage. This setting changes the minimum range that that unit can attack in.

This is a unique value in the Object editor. SOMEONE PLEASE DESCRIBE WHAT THIS VALUE IS / DOES!
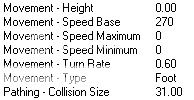
These settings affect how the unit moves and where it can go.
• The 'Movement - Height' value changes how far from the ground the unit is. Setting this value to zero entails that your unit will be flat on the ground. Anything above zero will raise the unit bit by bit.
• The 'Movement - Speed Base' value changes how quickly your unit moves. Zero meaning that your unit cannot move, 300 being the averaged speed between all units.
• The 'Movement - Speed Maximum' and 'Movement - Speed Minimum' values affect how quickly a unit can move and how slowly a unit can move. Leaving these values at 0 means that the game will use the Gameplay Constants values.
• The 'Movement - Turn Rate' affects how sharply your unit can turn. The higher this is, the wider your unit's turning will be. The lower this is, the sharper your unit's turning will be.
• The 'Movement - Type' value affects what the unit moves like. Generally you will not want to have a unit without some sort of visible flying counterpart to have flying type movement, as you probably do not want a unit like a Gryphon Rider having Foot type movement.
• The 'Pathing - Collision Size' affects how much space your unit takes up. Setting this value to zero will make it able to walk through other units.
(Unit part of this is not done.)
Please note that this tutorial is not complete. This is merely my first post to save it and get some suggestions for the first part. All criticism, sinicism, remarks, suggestions are very appreciated
")

