
Andrewgosu
The Silent Pandaren Helper
- Reaction score
- 716
Cinematics Tutorial
Frozen Throne required
In this tutorial I’ll be teaching almost everything one needs to know in order to make a cinematic in Warcraft 3. Topics to be covered are special effects, sounds and transmissions, fade filters, cameras, units’ animations and plenty more.
Special effects
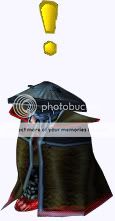
Lets start our cinematic journey with something simple – special effects. Special effects are used for many things, (e.g) for making an exclamation mark above a questgiver or to make a clam forest look like on fire.
Special Effect actions:
Create A Special Effect At Point
Creates a desired looking special effect at a given point on the map.
Create A Special Effect On Unit
Creates and attaches a special effect on unit. There is a wide variety of attachment points (listed below).
Destroy Special Effect
Destroys a given special effect.
Creates a desired looking special effect at a given point on the map.
Create A Special Effect On Unit
Creates and attaches a special effect on unit. There is a wide variety of attachment points (listed below).
Destroy Special Effect
Destroys a given special effect.
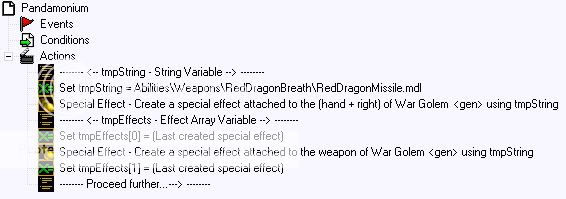
An example trigger on how to create a special effect "overhead" a unit. The effect is set into a variable for easy accessing later on.

Attachment points:
overhead (above the units’ head)
head
chest
origin (at the feet)
hand
foot
weapon (for heroes)
sprite (for buildings)
medium (for buildings)
large (for buildings)
head
chest
origin (at the feet)
hand
foot
weapon (for heroes)
sprite (for buildings)
medium (for buildings)
large (for buildings)
Attachment point modifiers:
left
right
mount (for mounted units)
rear (for quadrupeds)
first (for buildings)
second (for buildings)
third (for buildings)
fourth (for buildings)
fifth (for buildings)
sixth (for buildings)
rallypoint (for buildings)
right
mount (for mounted units)
rear (for quadrupeds)
first (for buildings)
second (for buildings)
third (for buildings)
fourth (for buildings)
fifth (for buildings)
sixth (for buildings)
rallypoint (for buildings)
Attachment points modifiers are needed, if one has a need of attaching an effect to a units hands, for example.
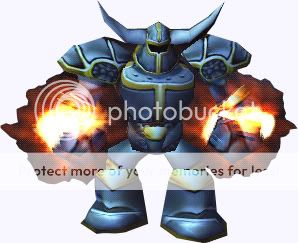
A War Golem with fiery looking special effects attached to its "hand + right" and "weapon" attachment points.
Animations
Sometimes, there is a need to play a specific units' animation or to change a units colour totally, in order to make the cinematic more real. Here are the explained actions to do that.
Animation Actions:
Play Unit Animation
Plays a specified units specified animation once. How to know what animations a unit has, comes below.
Play Unit Animation (Specific Rarity)
Plays a units animation based on the rarity. Common animations are stand, walk, attack, death etc. Rare ones unit specific. Every unit does not have a rare animation.
Queue Unit AnimationQueues a units animation - it will be played as soon as the the previous one has finished.
Reset Unit Animation
Resets the units animation. Use after you have played a units animation via trigger, so it wouldn't look like it's completely frozen.
Add/Remove animation Tag
Add/removes an animation tag to/from a unit, which didn't have it before.
Lock Body-Part FacingMakes a certain body part face another unit.
Reset Body-Part Facing
Resets units body-facing.
Change Unit Size
Changes the unit size. To change a unit size proportionally, the length, width and height have to be the same %.
Change Unit Vertex Coloring
Changes the units RGB colour. Also enables you to change the transparency of a unit.
Change Unit Animation Speed
Speeds up or slows down the units animation speed. Note, doesn't affect movement speed.
Change Unit Turn Speed
Changes the units turning speed.
Change Unit Blend Time
Changes how fast the units body-parts will face another unit.
Change Unit Flying Height
Allows you do modify a units flying height, provided, it can fly, of course. Height is the flying height and rate is the time it takes the unit to achieve the height. Time = flying height/rate.
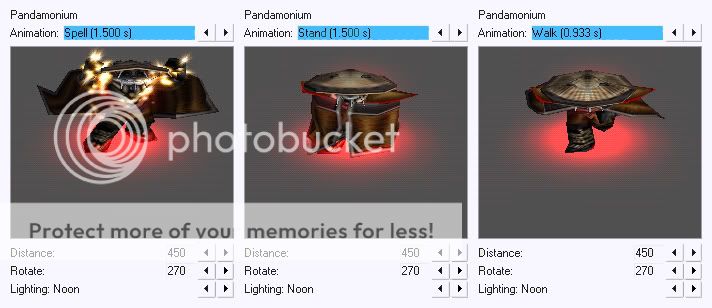
Each unit has a number of different animations. To actually check what animations, and how they are called, a unit has, check the animation screen in the object editor, when you select a unit.
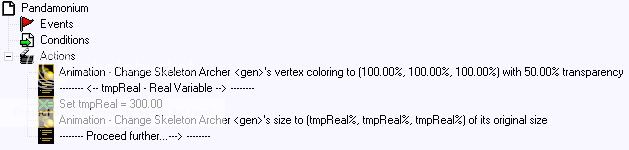
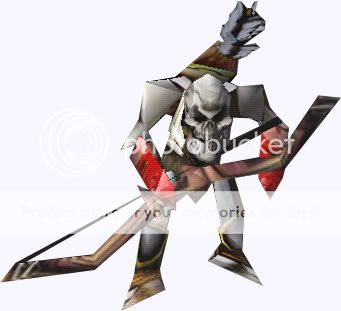
A semi-transparent and oversized Skeleton Archer
An example trigger how to make a unit face another. Comes in handy in cinematic scenes, where units have to face each other.

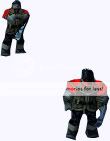
A peasant who is looking backwards, in the direction a fellow colleague, while it's body is facing the opposite direction.
Cameras
Cameras are the backbone of a cinematic. Without the usage of camerawork, you leave yourself only a limited number of options to trigger your cinematic.
To create a camera, go to "Layers->Camera" and in the camera pallete press "Create Camera". A blue camera should appear. Before we proceed further with camera actions, I'll explain a few details.
Target X
The X location of the camera's target.
Target YT
he Y location of the camera's target.
Rotation
Rotation of the camera around the target. 0° is facing east, and 180° is facing west.
Field of View
The width that the camera can see.

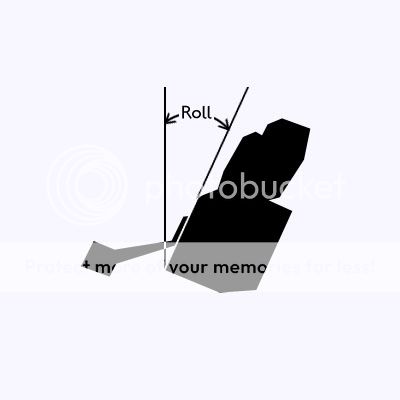
Roll
The angle the camera is turned.
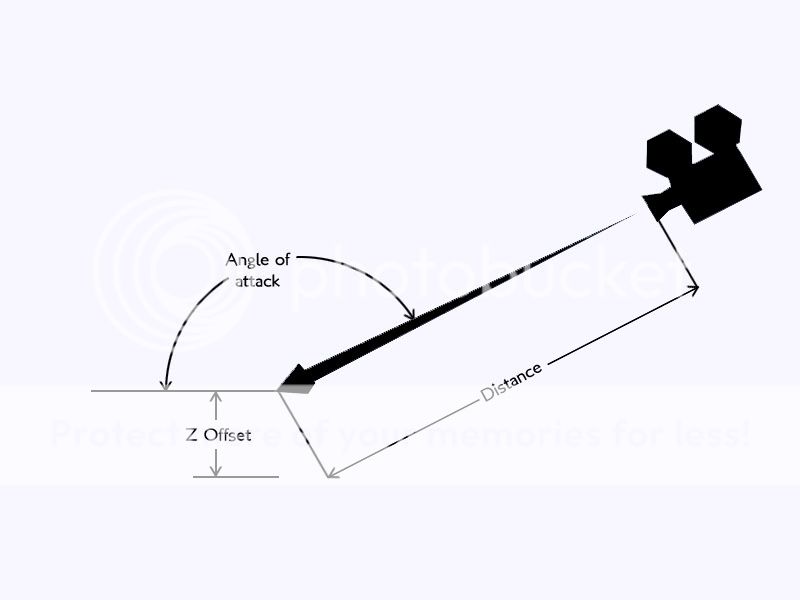
Angle of Attack
The angle the camera is pointing towards the target.
Distance
The distance between the camera and the camera target.
Z-Offset
The height between the camera target and the 0-ground.
Far Clipping
Total distance the camera can see.
The X location of the camera's target.
Target YT
he Y location of the camera's target.
Rotation
Rotation of the camera around the target. 0° is facing east, and 180° is facing west.
Field of View
The width that the camera can see.
Roll
The angle the camera is turned.
Angle of Attack
The angle the camera is pointing towards the target.
Distance
The distance between the camera and the camera target.
Z-Offset
The height between the camera target and the 0-ground.
Far Clipping
Total distance the camera can see.
Knowing these, it's quite easy to manipulate a camera to point at a target you desire.
Another great tip how to set a camera, is to select "View->Lock To Game Camera", zoom in/out, rotate the screen in the object editor and when happy with the result, press "Set Camera To Current View". This automatically sets all the camera fields values and sets the camera target view.
Camera actions:
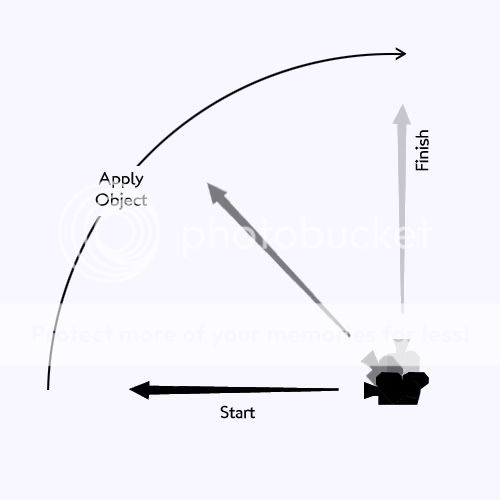
Camera - Apply Camera Object (Timed)
Moves the players' current view to target camera.
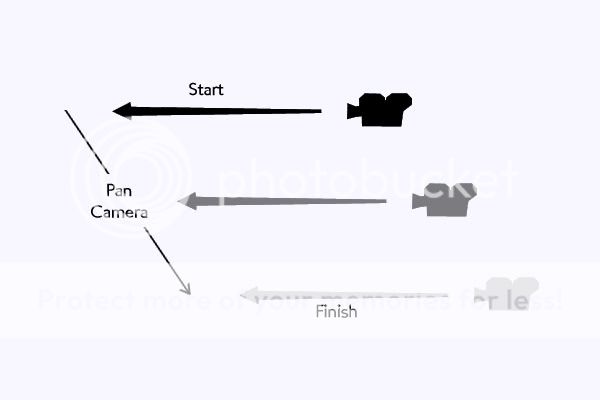
Camera - Pan Camera (Timed)
Pans the current view to a target location.
Camera - Pan Camera with Interpolated Height (Timed)
Pans the camera, while ensuring the view does not go below or through the terrain.
Camera - Pan Camera as Necessary (Timed) - Stay away in multiplayer, desyncs!
Pans the camera if necessary, meaning, if a player is viewing the right location, it will not pan, if the player is too far from the correct view, it pans.
Camera - Set Camera Field (Timed)
Sets a specified cameras field for the current view.
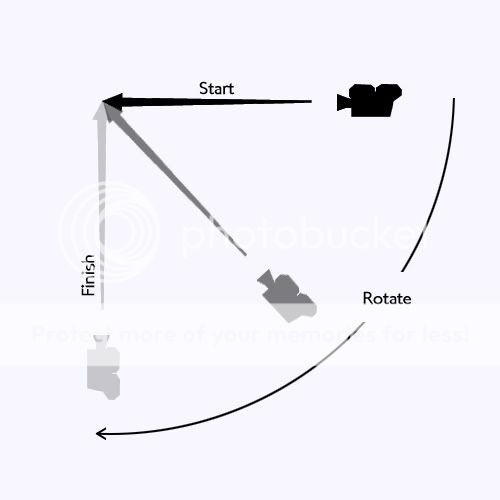
Camera - Rotate Camera Around Point
Rotates the current view around a target point at always a 0 z-offset.
Camera - Lock Camera to Target Unit
Locks the camera view to a unit. The camera follows the unit until reset.
Camera - Lock Camera Orientation to Target Unit
Locks the camera view to unit, but does not follow the unit. The perspective stays in place.
Camera - Play Cinematic Camera
Runs the players current view through a predetermined path which saved in a cinematic.mdl file.
Camera - Stop Camera
Stops the current camera from moving, but does not stop swaying or shaking.
Camera - Reset Game Camera
Resets the current camera to standard in game view.
Camera - Change Camera Smoothing Factor
Changes the smoothing factor of how a camera scrolls.
Camera - Rest Camera Smoothing Factor
Resets the smoothing factor to default values.
Camera - Sway Camera Source
Sways the camera back and forth around the target. Magnitude determines how far the camera will sway whereas velocity how fast it will sway.
Camera - Sway Camera Target
Same as the previous action, but sways the camera target instead of the camera.
Camera - Shake Camera
Shakes the entire current camera in all directions. Magnitude determines how much the camera is going to shake.
Camera - Stop Shaking/Swaying Camera
Stops shaking or swaying the camera.
Camera - Extend/Shrink Camera Bounds
Increases or decreases the camera bounds.
Camera - Set Camera Bounds
Sets the camera's bounds. E.g one can set it to a region and the players will only be able to pan inside it.
Camera - Set Spacebar Point
Set the point to be panned, when a player presses spacebar.
Moves the players' current view to target camera.
Camera - Pan Camera (Timed)
Pans the current view to a target location.
Camera - Pan Camera with Interpolated Height (Timed)
Pans the camera, while ensuring the view does not go below or through the terrain.
Camera - Pan Camera as Necessary (Timed) - Stay away in multiplayer, desyncs!
Pans the camera if necessary, meaning, if a player is viewing the right location, it will not pan, if the player is too far from the correct view, it pans.
Camera - Set Camera Field (Timed)
Sets a specified cameras field for the current view.
Camera - Rotate Camera Around Point
Rotates the current view around a target point at always a 0 z-offset.
Camera - Lock Camera to Target Unit
Locks the camera view to a unit. The camera follows the unit until reset.
Camera - Lock Camera Orientation to Target Unit
Locks the camera view to unit, but does not follow the unit. The perspective stays in place.
Camera - Play Cinematic Camera
Runs the players current view through a predetermined path which saved in a cinematic.mdl file.
Camera - Stop Camera
Stops the current camera from moving, but does not stop swaying or shaking.
Camera - Reset Game Camera
Resets the current camera to standard in game view.
Camera - Change Camera Smoothing Factor
Changes the smoothing factor of how a camera scrolls.
Camera - Rest Camera Smoothing Factor
Resets the smoothing factor to default values.
Camera - Sway Camera Source
Sways the camera back and forth around the target. Magnitude determines how far the camera will sway whereas velocity how fast it will sway.
Camera - Sway Camera Target
Same as the previous action, but sways the camera target instead of the camera.
Camera - Shake Camera
Shakes the entire current camera in all directions. Magnitude determines how much the camera is going to shake.
Camera - Stop Shaking/Swaying Camera
Stops shaking or swaying the camera.
Camera - Extend/Shrink Camera Bounds
Increases or decreases the camera bounds.
Camera - Set Camera Bounds
Sets the camera's bounds. E.g one can set it to a region and the players will only be able to pan inside it.
Camera - Set Spacebar Point
Set the point to be panned, when a player presses spacebar.
Fade filters
Fade filters are used (e.g) to show custom images over the screen or to fade out in the ending of the cinematic. It is quite easy to master them. I'll be showing a few tricks how to show them to a single player and how to manipulate them with ease.
Fade filter actions:
Fade Filter
Fades a specified texture on the screen with a defined fading pattern.
Advanced Fade Filter
Basically the same as the previous action, only enables you to set a few more extra options, like the starting and ending fade colours.
Show/Hide Filter
Shows or hides filters. Quite self-explanatory.
Fades a specified texture on the screen with a defined fading pattern.
Advanced Fade Filter
Basically the same as the previous action, only enables you to set a few more extra options, like the starting and ending fade colours.
Show/Hide Filter
Shows or hides filters. Quite self-explanatory.
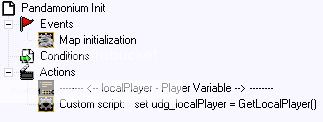
These actions fade a texture to all players. But how to show a fade filter to a single player? The process is not very difficult, you need only a single piece of custom script. Create the following trigger.
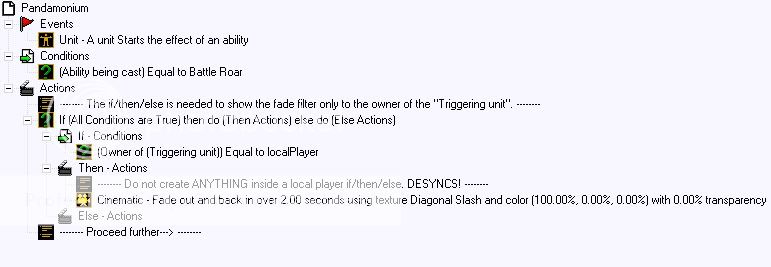
Now, you only need to create a trigger, which has fade filters in it, which are needed to apply to a single player. I'll show you an example. But, before I'll do that, I'll mention that anything, that is created inside "local player" actions, DESYNCS. So, stay away from creating units, special effect or floating texts etc. when inside a "local player" if/then/else.
Sounds and transmissions
A cinematic is nothing without sounds. Sounds make the atmosphere nevertheless, if there are no transmissions. Ambient sounds count, too. To play a sound, you need to open the Sound Editor, select a sound and click "Use as sound". That makes the sound a variable, which can be used in Trigger Editor.
Sound actions:
Play sound
Plays a non 3D sound to all players.
Play Sound At Point
Plays a 3D sound at a point with the given volume and z-offset. The sound is only heard when a player is viewing the location where it is being played.
Play Sound On Unit
Attaches and plays a 3D sound to a unit.
Play Sound From Offset
Plays a sound, skipping the first given seconds of it.
Stop Sound
Stops playing the sound. 2 options: stops it immediately or fades it.
Destroy Sound
Destroys a given sound variable.
Set Sound Volume
Allows the set a specified sound's volume.
Skip To Sound Offset
Skips the given seconds of an already playing sound.
Set Sound Cutoff Distance
Set the distance where the sound is cut off, meaning if a player scrolls too far the location where the sound is being played, he won't hear it anymore.
Set Sound Pitch
Allows you to set a specified sound's pitch.
Attach 3D Sound To Unit
Attaches a 3D sound to a unit, but doesn't play it.
Set 3D Sound Position
Sets a specified 3D sound's position where it will be heard if played.
Set 3D Sound Distance
Sets a specified 3D sound's minimal and maximal distance where it will be heard from the position it is playing.
Add/Remove 3D Sounds Across Region
Adds or removes a specified 3D sound to a region.
Use Daytime Ambient Theme
Allows you to use a specified tilesets daytime ambient theme.
Use Nighttime Ambient Theme
Allows you to use a specified tilesets nighttime ambient theme.
Enable/Disable Dusk Sounds
Allows you to enable/disable dusk sounds.
Set Music List (Using A Specified Initial Song)
Sets the music list, starting with a defined initial song.
Set Music List (Using A Random Initial Song)
Sets the music list, starting with a random initial song.
Clear Music List
Clears the music list.
Play Music
Starts to play a given music.
Play Music From Offset
Plays a music, skipping the first given seconds of it.
Play Music Theme - Good, when entering cinematic mode
Plays a defined music theme once.
Play Music Theme From Offset
Plays a music theme, skipping the first given seconds of it.
Stop Music Theme
Stops playing a music theme.
Stop Music
Stops playing music.
Resume Music
Resumes playing music.
Set Music Volume
Allows you to set the music volume.
Skip to Music Offset
Skips the given seconds of an already playing music.
Skip to Music Theme Offset
Skips the given seconds of an already playing music theme.
Set Volume Channel
Changes the channel music volume.
Set All Volume Channels For Cinematic
Setup all volume channels for cinematic scenes.
Set All Volume Channels For Speech
Setup all volume channels for cinematic speech transmissions.
Reset All Volume Channels
Resets all volume channels to default game settings.
The sound list is long, but already quite self-explanatory.
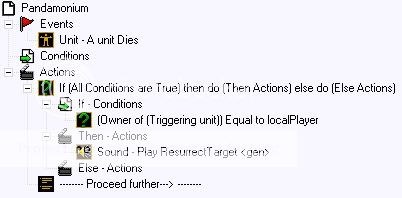
Remember the "localPlayer" variable from fade filter chapter? The same trick can be applied to playing sounds only for a single player.
Transmission actions:
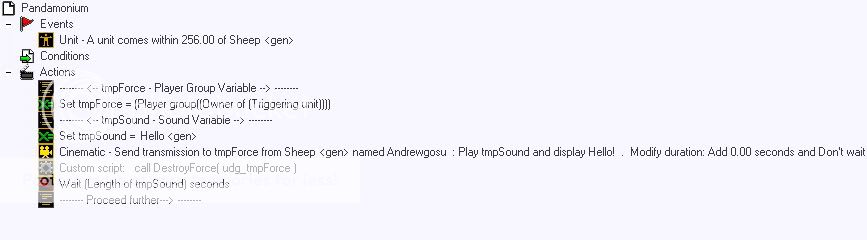
Transmission From Unit
Sends a transmission from a unit with the specified text, sound and length.
Transmission, when the cinematic mode is not turned on. The text is not shown.
Transmission in the cinematic mode. The text is shown.
Send A Transmission From Unit-Type
Sends a transmission to a player from a unit-type with specified text, sound and length.
Cinematic - Subtitle Display Overlay
Shows the subtitles, even, when the player has turned them off.
When making cinematics using sounds, a lot of people forget that one can wait the duration of the sound before proceeding rather than indirectly determine the time it takes for the sound to play.
Cinematic Setup
Now, knowing most about cinematics, how to deal with cameras, fade filters, special effects and sounds, there is the last tedious task of setting up the cinematic.
Cinematic Actions:
Cinematic Mode
Turns on/off cinematic mode.
Cinematic Mode (Timed)
Turns the cinematic mode on/off within the defined time.
Clear Text Messages
Clears the screen of text messages.
Letterbox Mode On/Off
Shows/hides the game interface.
Disable/enable User Control
Disables/enables control over units for a player.
Disable/Enable Occulsion
Disables/Enables making trees or objects in the way of the camera target transparent.
Disable/Enable Boundary Tinting
If enabled, tints the game boundary.
This is the end of Part I, I hope you enjoyed it. Stay tuned for part II. Feedback is always appreciated.


