
Quauhtli
I have the right to remain silent.
- Reaction score
- 62
Tutorial : Fog Effects
~By Quauhtli~
Table of Contents:
1.First Words
2.Fog Effects
3.Other Special "Foggy" Stuff
1. First Words
I haven't really seen any tutorials (in thehelper.net) about fog effects, and I know some people really want to use them, so I decided to make a tutorial about it. This tutorial will explain what Fog Effects are, how to make them, and I will also show some special stuff that can create special fog effects, but not in the normal Blizzard Way.
2. Fog Effects
Before we start creating a fog effect, you might want to know what a fog effect is. A fog effect creates a colored fog in the entire map. You can make it in all the colors you want, but you might need to experiment a lot before getting what you actually want. Now lets start creating our fog effect:
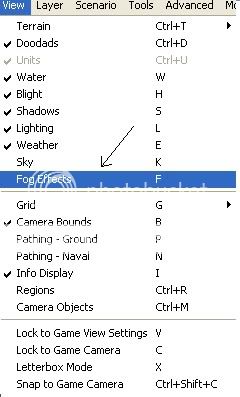
First of all, you would want to see your fog, because by default viewing fogs is unchecked. Go to View, and then click Fog Effects (or press F, a lot faster)
Now, we want to create the fog. In my tutorial I am going to make a sort of "underwater" fog effect, which, how did you guess it, makes your map look likes it is underwater (as long as you use enough underwater doodads of course...).
Go to Scenario, Map Options and click the Use Terrain Fog button. Now, choose the style (Linear is the best in my opinion, because you can still SEE stuff, using the other two, the map will become hardly seeable...). After that choose how strong your fog will look.
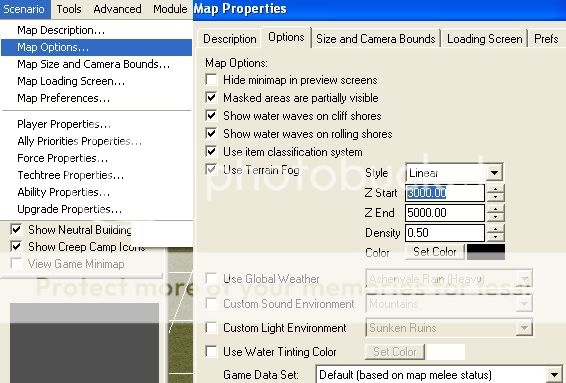
Z Start: Z Start means how deep it becomes. (Around 3000 will create the fog very strongly up high, but if you click your mouse wheel button (if you have it), you will see the game camera, and now see that the fog is hardly seeable now.) I will use 500, because this makes it look nice from above, but also in "normal" camera (mouse wheel button).
Z End: As far as I know, the best way to describe Z End is "how bright your fog will be". I will use 3500 for Z End.
Density: Density is how dense your fog will be, making an underwater fog it isn't really that important. 5 will do.
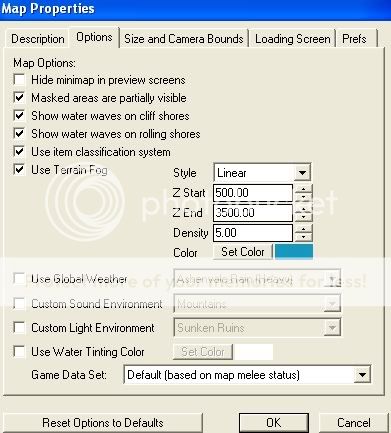
Color: Finally, the color of the fog. Using the same way you make all other colors, choose the color. This is what my fog menu looks like:
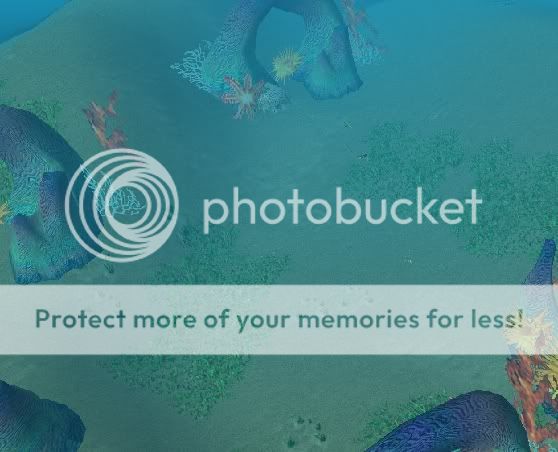
This is what our terrain looks like now.
Note: To create that "special" underwater feeling, you can also add the Rays of Moonlight weather effect.
3. Triggering Fog Effects
If you would like to have a fog only after a while (and you do not have a fog already made like above) you can make it after a while. Example, you are walking in the ruins of a castle and suddenly somehow the world floods. Now you would like to create an underwater fog as above. Of course there would probably first be an event but afterwards you can do this.
This sets the fog. Maybe then later after the rescue team has arrived from a boat above you would like to have no more underwater fog so you make the trigger
.
Now that's how you trigger fogs.
This way you can have different kinds of fogs (STILL AS LONG AS YOU DID NOT MAKE THE MAP OPTIONS ONE) and reset it and make a new fog.
4. Other special "Foggy" things
Now that we have the other things, I will show something that I commonly use. This is unique in some way, because you can use it on different places, using different colors. There are only a few colors though, so remember that.
What I do is make a new doodad, base the doodad on something like Blighted Mist, and change the model to any of the Glowing Runes (found in the Doodads section). Now change the Default Size to 15.00 and the colors to somewhere around 50 (50/255). Now place a few of them on the area where you want them. This is what it will look like:
Note: elmstfreddie's way for making dark terrain (like dungeons) is by making Smoke Smudge and changing its size to big.
Note: This will not be really good for underwater scenes, but still it is handy if you need some sort of corrupted area which warlocks have cursed or something, as seen in the picture above.
Thanks for reading!
Quauhtli
~By Quauhtli~
Table of Contents:
1.First Words
2.Fog Effects
3.Other Special "Foggy" Stuff
1. First Words
I haven't really seen any tutorials (in thehelper.net) about fog effects, and I know some people really want to use them, so I decided to make a tutorial about it. This tutorial will explain what Fog Effects are, how to make them, and I will also show some special stuff that can create special fog effects, but not in the normal Blizzard Way.
2. Fog Effects
Before we start creating a fog effect, you might want to know what a fog effect is. A fog effect creates a colored fog in the entire map. You can make it in all the colors you want, but you might need to experiment a lot before getting what you actually want. Now lets start creating our fog effect:
First of all, you would want to see your fog, because by default viewing fogs is unchecked. Go to View, and then click Fog Effects (or press F, a lot faster)
Now, we want to create the fog. In my tutorial I am going to make a sort of "underwater" fog effect, which, how did you guess it, makes your map look likes it is underwater (as long as you use enough underwater doodads of course...).
Go to Scenario, Map Options and click the Use Terrain Fog button. Now, choose the style (Linear is the best in my opinion, because you can still SEE stuff, using the other two, the map will become hardly seeable...). After that choose how strong your fog will look.
Z Start: Z Start means how deep it becomes. (Around 3000 will create the fog very strongly up high, but if you click your mouse wheel button (if you have it), you will see the game camera, and now see that the fog is hardly seeable now.) I will use 500, because this makes it look nice from above, but also in "normal" camera (mouse wheel button).
Z End: As far as I know, the best way to describe Z End is "how bright your fog will be". I will use 3500 for Z End.
Density: Density is how dense your fog will be, making an underwater fog it isn't really that important. 5 will do.
Color: Finally, the color of the fog. Using the same way you make all other colors, choose the color. This is what my fog menu looks like:
This is what our terrain looks like now.
Note: To create that "special" underwater feeling, you can also add the Rays of Moonlight weather effect.
3. Triggering Fog Effects
If you would like to have a fog only after a while (and you do not have a fog already made like above) you can make it after a while. Example, you are walking in the ruins of a castle and suddenly somehow the world floods. Now you would like to create an underwater fog as above. Of course there would probably first be an event but afterwards you can do this.
Code:
Environment - Set fog to style Linear, z-start 500.00, z-end 3500.00, density 5.00 and color (5.00%, 25.00%, 100.00%)
Code:
Environment - Reset fog to default valuesNow that's how you trigger fogs.
This way you can have different kinds of fogs (STILL AS LONG AS YOU DID NOT MAKE THE MAP OPTIONS ONE) and reset it and make a new fog.
4. Other special "Foggy" things
Now that we have the other things, I will show something that I commonly use. This is unique in some way, because you can use it on different places, using different colors. There are only a few colors though, so remember that.
What I do is make a new doodad, base the doodad on something like Blighted Mist, and change the model to any of the Glowing Runes (found in the Doodads section). Now change the Default Size to 15.00 and the colors to somewhere around 50 (50/255). Now place a few of them on the area where you want them. This is what it will look like:
Note: elmstfreddie's way for making dark terrain (like dungeons) is by making Smoke Smudge and changing its size to big.
Note: This will not be really good for underwater scenes, but still it is handy if you need some sort of corrupted area which warlocks have cursed or something, as seen in the picture above.
Thanks for reading!
Quauhtli

