? I think better make tuts what teach ppl to use paintshop or gimp not just recoloring. Btw we need all new models and gret ones btw not just some cheesy blizzard premade units coloring things. I could use R B G colors too if I could wanted red ghoul >.< Still it tech ppl so great tut anyway. I saw a model what has custom made skinning its goblin with bike (www.warcraft3campains.net- or something like that) they have alot of great stuff. And by painting things over and over dosn' t help much Lol I' m stuck with my soccer map custom tilres, I will look out GIMP then lol and try what I can do. Coz PhotoImpact was such a headace. Nothing worked there >.< I' m beginner too.
Purpose: This tutorial teaches you some main tools and techniques in photoshop, in order to skin better than normal people.
Note: This tutorial is rather long, so take you're time studying it.
Step 1
– Getting started
I'm going to modify ghouls skin, so convert it into .tga and open it in Photoshop.
Note: If you don't know how to convert it, read my other skinning tutorial's first part.
Step 2
– Replacing the bones
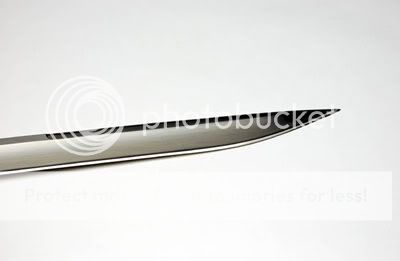
You should see the ghouls ribs. We are about the replace them with the blades, using the base image below.
Base image
Copy paste the base image, and cut the unwanted parts away with the pen tool. Don't flatten the layer after cutting.
Now, copy-paste the blade image to your ghoul skin. Start replacing one of the backbone by using scale and rotate tools to match the size and curves of it.
After that, duplicate the layer and use the same technique above to match another bone, until you have all of them done.
As you can see, you got many layers now. Hide the main ghoul layer and merge visible the blade layers. Merge can be found under Layer.
Note: Hide is when you click on the eye image, left of the layer name, and unhide is when you click it again.
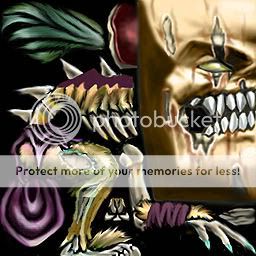
You should have 2 separate layers, the ghoul skin and the blade layer. Hide the blade layer, and select all the backbones and ribs with the pen tool. Then unhide the blade layer, activate the selection, invert it, and then delete it.
Meanwhile, I have replaced the teeth and the toes too.
You should see something like this.
Step 3 – Replacing textures
For the 3rd step, we are going to add some blood texture. Select some parts of the metal ribs, and the big hole in his leg with pen tool, but dont activate the selection yet.
Note: You can apply blood effect on the teeth too.
Blood Image
Copy paste the blood image to your skin, above the skin layer and set the blending to hard light.
Then activate the selection on the blood image layer, invert it and delete the inverted part.
You should have 3 layers by now, skin layer, blade layer and the blood layer.
To finish off the blood layer, use Filter>Blur>Gaussian Blur on it.
Step 4 – Colouring
Note: Zoom tool is your best friend
Now, we’re going to use the Hue/Saturation tool to colour the rest of the ghoul’s body. Duplicate the skin layer, and use Hue/Saturation tool on it. You can pick any colour you wish, I'm going to use a dark red one.
As you can see, the eyes and some unwanted ares are coloured too. that's why
I duplicated the layer. Select all the unwanted ares on the coloured skin layer using pen or polygonal lasso tool and erase them.
After that, I'm going to darken the red skin layer and the skin layer a little bit by using the
brightness /contrast tool.
Brightness/Contrast tool
Use these setting on the red skin layer.
After done that you should see this below.
Step 5 – Final touch
For final touch I'm going to tint the hair black. Select the skin layer and use the pen tool on the hair. Select the hair. After that, desaturate it.
When desaturated, use the brightness/contrast tool again.
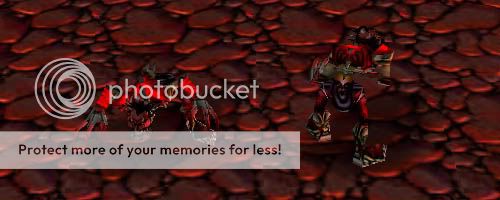
If you have followed every step right, your final result looks like this
In game Screenshot
Note: If you can find any grammar mistakes, quote them and tell me. Thanks for reading. Any feedback appreciated.
All the images, blood and blade, are googled. You can find even better ones, if you wish or can.
Hey, I have no idea if this thread is too old to be noticed anymore or anything like that, but I am having some problems importing my Photoshopped skins into the World Editor. I have followed all the instructions in this tutorial, and I've made a pretty good looking skin, but when I go to the World Editor, there is no such thing as the "Import Manager." Is this strange? Is this because I have an inferior version of the World Editor? Does anyone know why this is? I would really appreciate anyone's help on the subject, because quite frankly, I am very confused. Thanks.
I'm on a page about incorrect corrections, and spent the better part of like two hours trying to get someone to understand that -5^2 = -25, not 25, and then that post had comments get reposted because that group is self sustaining, and that person was in turn trying to explain what I just explained to them. And I'm taking that as a victory

") https://www.thehelper.net/threads/crispy-fried-pork-chops.193874/
https://www.thehelper.net/threads/crispy-fried-pork-chops.193874/