Simple sfx modeling
By Vestras
What is a sfx?
A sfx is a model, a model normally used for spells or so. For example the Shockwave model - that is a sfx model. Sfx actually stands for special effect.
(Definition of model: http://en.wikipedia.org/wiki/3d_model#test)
Sfx are the simpler type of models, they don't take up much time to make and they really aren't that hard, atleast normally. (Depends on what you want to make)
Simple sfx - simple? What?
Yeah, in this tutorial we're gonna make simple sfx models. I'm also gonna make an advanced sfx tutorial, but in there I won't explain where stuff are, so I suggest you to read this first.
So what defines a simple sfx? You see, a simple sfx normally only consist of something named 'nodes'. Nodes can be much - from sounds to small particles (small models that can bounce 'n' stuff - those are basically the 'engine' of simple sfx models) so those are what we're gonna work with... much.
Thanks to Nerfpl for editing the pictures!
Tools required
Magos' Model Editor - this tool is basically just a text editor with an interface, makes making sfx models much easier.
And that's it! Easy, huh? And it's even free!
Getting started
Before we'll start on making our model, we're going to get known to the stuff in the model editor.
0.01 - go to the menu File and select New.
1.00 - go to Edit > Properties and under Display, check Debug Information. Also check Use Ground Texture under Ground Texture. This will make your screen (hopefully) look something like this.

Our textures
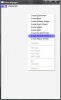
1.01 - go to Windows > MPQ Browser and click the menu File. Then open War3x.mpq.
1.02 - we will now select the textures we're gonna use. In this tutorial, we'll make a gigantic bomb of teh 1337ness, so we'll go into Textures and find Clouds8x8.blp and Clouds8x8ModFire.blp. Right click on them, and select Use as Texture.
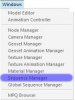
1.03 - we can now view the textures we've selected. Close the MPQ Browser and go Windows > Texture Manager.
1.04 - double click one of the textures to view them.
Animations
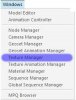
1.05 - now we'll start making our model. Go to Windows > Sequence Manager.
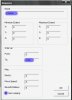
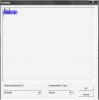
1.06 - right click on the empty menu. Select Create. A window pops up, make everything look like this pic.
1.06b - so what are those that we have changed? Well, Name is of course the name of the animation, and the Non Looping checkpoint thingy just makes the comp know that we don't want it to repeat the animation over and over again, since the animation is not a stand or walk animation. And here comes the tricky part -- Interval; the From and To are just integers, they decide how long the animation takes to finish and when it should be played. So when we play our Death animation, it runs a timer like thingy, that runs from 0 to 1300.
1.07 - now we're going to make the particles, but before that, we're going to have to be able to view our animation in the background. So therefore, we will go to Windows > Animation Controller.
1.08 - at the part where it says Unanimated, click and select our Death animation. Now check the box where it says Always Loop and then quit the window.
The model itself
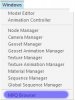
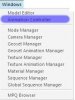
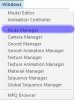
1.09 - now we're getting to the fun part. Go to Windows > Node Manager.
1.10 - wow, a whole new, empty box! So exciting! Right click in empty space, and select Create Particle Emitter 2. You will now see this.
1.11 - right click on your newly created particle emitter, and select Edit Node. You're now able to give our particle emitter a name, and a place to spawn. The place you can give it a name is of course the place titled Name, but the place where you can place the spawn point is a bit more tricky. You see, a model's center is called a Pivot Point, and this is basically where the model is firstly created at. In this window, you're able to see the Pivot Point, aren't you? 0, 0, 0 is the perfect center of the 'world'. We'll change the Z to 50.
The particle fields
1.12 - don't worry, you're doing great! And soon, you're able to see something! Well, right click on your particle emitter again, and select Edit. (You can also just double click on it) A gigantic box should now open. At the top left corner, there's a box named Visibility. There should also be a checkbox named Animated. Check it. Now click the box named Visibility. A new box should pop up.
1.13 - remember, in the sequence manager, that we put the From to 0 and the To to 1300? Well, this is where it'll be necessary to remember. Because we're going to type it into here.
1.14 - so what does the 1 and 0 mean? You see, in comp language, 1 means true and 0 means false. So basically, you tell the comp that the particles are visible from 0 to 1300. Pretty cool, huh?
1.15 - Emission Rate -- what is that? This is the number of particles spawned when the emitter becomes visible, aka at 0. We'll put this to 160 (NOTE: too high Emission Rates can make the game lag!)
1.16 - Speed -- this defines the speed of the particles emitters. This is really just what the name applies. Try playing around with it, but I'll set this to 300.
1.17 - Variation -- this is how much space there is between each particle. I'm gonna set this to 2, as we want a big explosion with nearly no space between the particles.
1.18 - Latitude -- This is pretty complicated. It basically controls whether particles travel directly upwards, in a cone or in a sphere. Directly upwards is the 0 value, then from there to a certain value it's all about how big the emitting cone is, and at a certain value it becomes a sphere. Again, try to play around with it. Set this 250.
1.19 - Width and Length -- The same as the name applies. Basically just how far the emitter can go when they emit. It's like a boundary. (NOTE: not the scale of the particle!)
(NOTE: Magos actually messed those two up! Length is actually width and the other way around!) Just put both to 10.
1.20 - Gravity -- it's the same thing as the real world. This is a bomb, it goes up. -2200.
1.21 - this time it's the Rendering box... this just applies the texture to the particle. Select our Textures\Clouds8x8.blp.
1.22 - Filter Mode -- this is also quite complicated, this basically applies a filter to the texture.
Transparent -- this alpha's out the alpha layer of the texture.
Blend -- the same as Transparent, just much better. Better fading. Useful for thick stuff, like smoke. Basically makes the texture more 'thick'.
Additive -- the most used filter. This removes the white of the texture, and has a ghost-like effect. Basically makes the texture more 'thin'.
Add Alpha -- some as Additive, just a more gentle effect.
Modulate -- the exact opposite of Additive; removes the white, but makes the texture darker.
1.23 - Segments -- this is what colors, scales and alpha's the particles. Experiment with them. (Change them to some firey colors)
Also change the Segment 1 Alpha to 255, Segment 2 Alpha to 255 and Segment 3 Alpha to 0. This makes our particle fade out.
1.24 - Flags -- look in the spoiler.
Unshaded -- the particle will not be affected by ingame lightning effects. Check this.
Unfogged -- whether fog affects the particle or not. (Like if you're able to see fire or not when it's in fog)
Alpha Key -- I don't know.
Line Emitter -- if the particle moves in a 3d way or a 2d way.
Sort Primitive Far Z's -- I don't know.
Model Space -- makes the particle follow the unit it is attached to. (If any)
XY Quad -- makes the texture 'flat'. (Basically just make it lie down)
Squirt -- this makes the particle face where it's going.
Head -- this makes our particle visible. Check this.
Tail -- this makes our particle have a 'tail'. Basically just a line following it.
1.25 - Rows & Columns -- if you had opened the Clouds8x8.blp texture, you had seen that it consisted of 8x8 images in one file. Well, when we type a number into Rows or Columns, it tells how many images there is in the texture per row or column. Set both to 8.
1.26 - Life Span -- tells the comp how long we want our particle to 'live'. Set this to 0.5.
1.27 - Tail Length -- only applies if 'Tail' is checked. This just sets the length of the tail.
1.28 - Priority Plane -- this sets our particle to be higher up than it normally is.
1.29 - Replaceable ID -- Used for team colored particles.
1.30 - Time -- this defines the time between each Segment. Set this to 0.3.
1.31 - Head (Life Span), Head (Decay), Tail (Life Span) and Tail (Decay) -- Start - remember Rows & Columns? Well, Start tells the particle what image on the texture to start with and End tells where to, well, end. I don't know what repeat is, but just don't change it. Has always worked for me.
")
1.32 - this is how everything should look when you're done.

So yeah, that's it for learning. From now on, I won't explain anything, unless I haven't explained it before.
Finishing the sfx
So right now, our effect really isn't that cool. So therefore, we're going to add another particle.
So create the particle, name it what you want and change the Z to 75. Now change Visibility to 0: 1 and 700: 0, Emission Rate to 250, Speed to 300, Variation to 1, Latitude to 250, Width and Length to 1 and Gravity to 0. Pick our Textures\Clouds8x8ModFire.blp texture and change Filter Mode to Additive. Now change our colors to some firey colors, like red, orange and yellow. Set the Scaling of Segment 1 to 15, Segment 2 to 25 and Segment 3 to 30. Just go plain 255 for all alpha's. Check Unshaded and Head, set End of Head (Life Span) and Head (Decay) to 64, set Rows and Columns to 8, Life Span to 0.5 and Time to 0.3. Now click 'ok'.
A little bit boring, isn't it? Yeah, I think so too. So let's add some awesomeness to it.
We're now gonna find a new texture in the War3x.mpq - Textures\Shockwave1.blp. Find it and and use it as a texture.
Now go to the Node Manager, and create a new particle. Name it what you want, and change Z to 35.
Set Visibility to 0: 1, 900: 0, Emission Rate to 20, Speed to -20, Variation to 1, Latitude to 0, Width and Length to 1 and Gravity to 0. Select our newly added Textures\Shockwave1.blp and select Additive as Filter Mode. Again find some firey colors for our texture, and set Segment 1 Scaling to 150, Segment 2 Scaling to 250 and Segment 3 Scaling to 500. Set all Segment's alpha to 255, expect Segment 3. Set that one to 0. Check Unshaded, XY Quad and Head. Set Life Span to 0.5 and time to 0.3.
Ey, cool, a shockwave coming out! But is it enough? Never! So right click our shockwave emitter, and select Duplicate. You will now see a copy of our shockwave emitter, but at the 'side' of our first one! Right click the Duplicated shockwave emitter, and select Move Left. Now go change the name and Z of the emitter, I changed the Z to our normal Z + 30. Now go into our Duplicated shockwave emitter and decrease the Scaling and select our Textures\Shockwave1.blp.
Do this 5 times, and you'll have an awesome looking effect! Mine looked like so:

Saving our model
When saving our model, always remember to put the extension on! (.mdx or .mdl) If the model is to be imported into the WE, use .mdx. If you want to .mdl edit it (notepad model editing), save it as a .mdl.
Moving on
I am currently working on an 'Advanced sfx modeling' tutorial, so be patient! I'll post a link to it in this tutorial when I'm done! (Sorry, I got quite much stuff to do at the moment, so you gotta be patient
)Thanks for reading!