How To Upload A Screenshot

WolfieeifloW

WEHZ Helper
Reaction score
372
How To Upload A Screenshot
Created By: Wolfie[NoCT]


This is my first attempt at a tutorial, suggestions/constructive criticism are welcome, flaming is not.
Feel free to rate the thread also!
Flaming will most likely result in -rep from me, and others.


How To Upload A Screenshot

You don't know how to upload a screenshot?
Well read this tutorial and by the end you'll be a pro at it!

All you need to accomplish this task is:
  • A computer
  • A photo editing program (Even 'Paint' will do)
  • Access to the internet


Contents

I've made a table of contents for users who just need to know certain parts and/or just forget certain steps.

NOTE: To find a step quicker, highlight the code in the []'s (example: ^wip) and press CTRL + F;
Now press "Next" twice in the "Find" box that came up.


1. What is a screenshot? [^wis]
2. How to take a screenshot. [^hts]
3. Saving the screenshot. [^sts]
4. Uploading the screenshot. [^uts]
5. Putting your screenshot into a post on TH.net! [^pyt]
6. Making your image a link! [^myl]
7. Why make this tutorial? [^wmt]


1. What is a screenshot?[^wis]

A screenshot is a picture of your monitor in it's current state.
When you press the PRINT SCREEN button, your computer will copy a picture of your monitor, and all it's contents visible on the screen, onto the computers clipboard.
With this copied image, you can paste it into a photo editing program and do anything you want with it!


2. How to take a screenshot.[^hts]

To take a screenshot, locate the Print Screen / SysRq button on your keyboard.
It may differ in looks a little bit from keyboard to keyboard, so here's a couple images:
prtscrnbutton2wz8.jpg
- - -
prtscrnbuttonoverallqb5.jpg
- - -
prtscrnbutton1ov8.jpg


3. Saving the screenshot.[^sts]

You have to save the screenshot to your computer's hard drive before being able to upload and post it.
To do this simply open any photo editing program you have [Even Paint works] and press CTRL + V.
This will paste the screenshot into the program.
Now, if desired, edit the photo and save it to your computer somewhere where you'll remember.

NOTE: You may wish to make black boxes over important/personal info.
This could include email addresses, IP addresses, "real life" names, etc.


4. Uploading the screenshot.[^uts]

To upload your screenshot means to put it on the internet.
There are loads of sites out there that can do this for you, however, I recommend:
ImageShack, Photobucket, or TinyPic.
So, to upload your picture go to one of these sites and locate the Browse... button:
ImageShack said:
TinyPic said:

After locating the Browse... button and clicking it, find the location of the picture that you saved.
After locating the picture, click OK, and then click host it! for ImageShack and UPLOAD NOW! for TinyPic.
The picture will take anywhere from a few seconds to a few minutes depending on size, the type of file, etc.

NOTE: You have to sign up for Photobucket.


5. Putting your screenshot into a post on TH.net![^pyt]

The final step!
Once your picture has finished uploading, find the Direct Link..... box.
Copy this web address.
Now on TH.net, wherever you want the image to show, simply put this:
Code:
[noparse][img]YourImagesLink[/img][/noparse]
That's all there is to it!
Here's an example:

Code:
[noparse][img]http://img165.imageshack.us/img165/552/finalimagekx2.jpg[/img][/noparse]
Turns into:
finalimagekx2.jpg


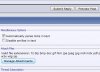
Alternatively, when posting a reply, click on the "Go Advanced" button.
Below where you write in your reply, there is a button that says "Manage Attachments" (refer here for a picture).
After clicking the button, in the window that popped up click "Browse...".
Locate the file on your computer, click "OK" then click "Upload".
Wait for your picture to finish uploading, then just close the attachments window.


6. Making your image a link![^myl]

To make your image link to something, you need to use the [noparse][/noparse] tag.
Here's an example that links to my profile, using the same image from above.
This:
Code:
[noparse][url=http://www.thehelper.net/forums/member.php?u=23302][img]http://img165.imageshack.us/img165/552/finalimagekx2.jpg[/img][/url][/noparse]
Turns into:

Click on the picture to go to my profile.

I'll clarify that code box a bit, as it might look like a lot of jumble.
Here's the original:
Code:
[noparse][url=http://www.thehelper.net/forums/member.php?u=23302][img]http://img165.imageshack.us/img165/552/finalimagekx2.jpg[/img][/url][/noparse]
This part:
Code:
[noparse][url=http://www.thehelper.net/forums/member.php?u=23302][/noparse]
Initiates the link.
The "[noparse]http://www.thehelper.net/forums/member.php?u=23302[/noparse]" is the web address of my profile.
Change this line to the web address of whatever you are linking to.

This:
Code:
[noparse][img]http://img165.imageshack.us/img165/552/finalimagekx2.jpg[/img][/noparse]
Puts the image as the link's text.
As opposed to having actual text such as "My Profile" I'm using the picture as the thing people click on to go to my profile.
The "[noparse]http://img165.imageshack.us/img165/552/finalimagekx2.jpg[/noparse]" is the web address of the picture I'm using for people to click on.
Change this line to the web address of the picture you want the user to click on as the link.

This:
Code:
[noparse][/url][/noparse]
Closes the link.
Whenever you open a link (using "[noparse][/noparse]") you must close it using "[noparse][/noparse]".


7. Why make this tutorial?[^wmt]

I made this tutorial because I've seen in a lot of threads people asking how to upload an image;
Either because they don't know how to take the screenshot, or because they don't know how to upload it.
I made this tutorial to clarify all of these points in one place.
Plus now all the veterans can link to this thread instead of explaining it every time!


--------------------------------------------------

Thanks for reading this tutorial.
If it helps even one person, I feel I've done my good deed for the day.
Again;
This is my first attempt at a tutorial, suggestions/constructive criticism are welcome, flaming is not.
Feel free to rate the thread also!
 

CaptDeath

New Member
Reaction score
103
Yay! I never will again have to guide some one to the screen shot button[ive done like 6 times]
thanks wolfie +rep[--edit needz to spread] and 5/5 rating :)
 

WolfieeifloW

WEHZ Helper
Reaction score
372
Ah yes, that's what I forgot to put in the post!
Adding This In said:
I made this tutorial to clarify all of these points in one place.
Plus now all the veterans can link to this thread instead of explaining it every time!
Thanks for the rating!
 

Slapshot136

Divide et impera
Reaction score
471
when posting a new reply, you can also hit the "manage attachments" button and attach it like that to get a small thumbnail (like the one at the bottom of this post).. just fyi
 

Attachments

  • attachment.jpg
    attachment.jpg
    23.3 KB · Views: 268

NullCurrent

( ゚ε ゚)
Reaction score
110
Yeah, when you use the way slapshot described, the file is saved to the site and will never go away if a different website goes down.
 

WolfieeifloW

WEHZ Helper
Reaction score
372
Yeah, but I don't like using this method as it takes up your attachment space;
Which, in my opinion, can be used for much better things ;) !
Thanks for the suggestion, I guess I'll add it in actually, +rep.

EDIT: Reread #5, I've added in your suggestion.
I've used your picture as a reference, so if you could leave if posted up here that would be awesome.
 

enouwee

Non ex transverso sed deorsum
Reaction score
240
You should point out that this method doesn't work for anything that's using overlays.
 

WolfieeifloW

WEHZ Helper
Reaction score
372
Nice tutorial for the newbies. It's just a shame that they never read the "Please Read" threads or else there would be no need for this sort of thing.
It was moved, rightfully, from Tutorials and Resources to here.
And it is a shame :p .
I know I didn't read them until after I posted probably 50 posts.
You should point out that this method doesn't work for anything that's using overlays.
I don't know what you're talking about :p .
Could you PM me and we'll talk about it through PM's instead of spamming this thread?
 

UndeadDragon

Super Moderator
Reaction score
447
Can you please stop writing in big text, it doesn't look good...

Your tutorial is quite good, but I don't particularly like the presentation of it. Overall, a good job.
 

enouwee

Non ex transverso sed deorsum
Reaction score
240
Could you PM me and we'll talk about it through PM's instead of spamming this thread?
Could you please use a standard font when posting? If I want the text bigger, then I'm using the browser's zoom feature.

Hardware overlay is a technique to improve system performance by offloading all the video rendering to the graphics card, rather than having the CPU copy that data to memory.

Such parts of the screen can't be caught inside a screenshot easily. You either have to reduce video acceleration (inside the display properties) or use a specialized tool like HyperSnap. Test it for yourself by taking a screenshot of a windows containing a 3D game, DVD or even a Youtube video. Unless you've got a badly configured system or older hardware, you'll see a black/color square rather than the video itself.

Furthermore, you should include the various keyboard shortcuts in your tutorial, such ALT-Print-Screen to capture only the active window.
 

WolfieeifloW

WEHZ Helper
Reaction score
372
Can you please stop writing in big text, it doesn't look good...
Your tutorial is quite good, but I don't particularly like the presentation of it. Overall, a good job.
Fixed the text, sorry.
Any suggestions to fix the presentation, so I can make it better?
Could you please use a standard font when posting? If I want the text bigger, then I'm using the browser's zoom feature.
Again, sorry.
Hardware overlay is a technique to improve system performance by offloading all the video rendering to the graphics card, rather than having the CPU copy that data to memory.
Never heard of it before / done it, I don't think :p .
If someone is doing that though, they probably already know how to do something like a simple screenshot ;) .
Such parts of the screen can't be caught inside a screenshot easily. You either have to reduce video acceleration (inside the display properties) or use a specialized tool like HyperSnap. Test it for yourself by taking a screenshot of a windows containing a 3D game, DVD or even a Youtube video. Unless you've got a badly configured system or older hardware, you'll see a black/color square rather than the video itself.
My system isn't badly configured nor old, and I didn't get a black/color square when I took a screenshot a YouTube video :confused: .
Furthermore, you should include the various keyboard shortcuts in your tutorial, such ALT-Print-Screen to capture only the active window.
I don't know these shortcuts;
If you could make a list and PM it to me I will add them in though.
 

enouwee

Non ex transverso sed deorsum
Reaction score
240
My system isn't badly configured nor old, and I didn't get a black/color square when I took a screenshot a YouTube video :confused: .
Only recent releases of Flash make use of hardware acceleration, it could even depend on the browser you're using. The only time I tried to capture a screenshot of a video, I had to deactivate video acceleration. Give it a try in your favorite media player.

If you could make a list and PM it to me I will add them in though.
Yeah, sure... I'd rather link to a page that covers the topic in-depth for multiple platforms. Its sober layout makes things easier to read too.
 
General chit-chat
Help Users
  • No one is chatting at the moment.

      The Helper Discord

      Members online

      Affiliates

      Hive Workshop NUON Dome World Editor Tutorials

      Network Sponsors

      Apex Steel Pipe - Buys and sells Steel Pipe.
      Top